


Printing
Phaser 6140 Color Laser Printer
User Guide
86
Printing on Custom-size Paper
This section includes the following:
• Printing on Custom-size Paper Using the PostScript Driver on page 86
• Printing on Custom-size Paper Using the PCL Driver on page 86
Note: When setting the paper size in the printer driver and control panel, be sure to specify the
same size as the actual paper used. Setting the wrong size for printing can cause a printer error.
This is especially true if you configure a bigger size when using a narrow-width paper.
Printing on Custom-size Paper Using the PostScript Driver
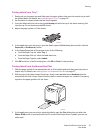
1. Load the custom-size paper in the tray you want to use. For details, see Loading Paper on page 55.
2. In the application you are printing from, open the Print dialog box and select the Phaser 6140
PostScript driver.
3. Do one of the following:
• To print using a custom size you saved under a unique name, in the Print dialog box, select the
custom paper size name from the dialog box size menu or list. Click the Properties button and
skip to step 4.
• To print using the driver’s Custom Page Size defined in the PostScript driver’s properties, in the
Print dialog box, click the Properties button and then, in the Paper/Output tab, select Custom
Page Size from the Paper Size list. In the PostScript Custom Size Settings dialog box, leave the
settings as is or change them if needed to match the paper you are printing on and then click
OK.
4. In the Paper/Output tab, do the following:
a. From the Paper Type list, select the paper type.
b. From the Paper Tray list, select the tray to print from.
5. Select any other desired options and then click OK.
6. In the Print dialog box, click OK (or Print) to start printing.
Printing on Custom-size Paper Using the PCL Driver
1. Load the custom-size paper in the tray you want to use. For details, see Loading Paper on page 55.
2. In the application you are printing from, open the Print dialog box and select the Phaser 6140 PCL
driver.
3. Click the Properties button.
4. In the Paper/Output tab, do the following:
a. From the Paper Size list, select the name of a custom-size you created.
b. From the Paper Type list, select the paper type.
c. From the Paper Tray list, select the tray to print to.
5. Select any other desired options and then click OK.
6. In the Print dialog box, click OK (or Print) to start printing.