


Troubleshooting
Phaser 6140 Color Laser Printer
User Guide
145
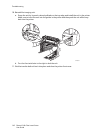
3. If you need to make any horizontal or vertical adjustments, proceed to Entering Color Values on
page 145.
Entering Color Values
Using the printer control panel, enter the values that you found in the Color Registration Correction
Chart to make adjustments.
1. On the printer control panel, press the Menu button.
2. Press the Down Arrow button to go to Admin Menu and then press the OK button.
3. Arrow down to Maintenance Mode and press OK.
4. Arrow down to Adjust Color Regi and press OK.
5. Arrow down to Enter Number and press OK.
6. For setting the horizontal values, arrow down to Fast Scan and press OK.
7. Press the Up or Down Arrow button until the required value on the chart is selected, then press the
Forward Arrow button once to move the cursor to the next value that requires adjustment.
8. When the horizontal adjustments are complete, press OK.
9. Print the chart again to check the values: press the Back Arrow button, press the Up Arrow button
to select Color Regi Chart and then press OK to print the chart. The values you just changed should
be shown as the new 0 point.
10. If 0 is not displayed next to the straight lines, examine the chart and determine additional
correction values. Beginning with step 7, repeat the steps to continue making adjustments until 0 is
next to the straight lines. The color registration adjustment is complete when the straightest Y, M,
and C lines are next to the 0 line.
11. When satisfied that the horizontal adjustment is complete, press the Menu button to return to the
main Menu screen.
12. For setting the vertical values, repeat steps 1 through 5 and then, at Slow Scan, press OK.
13. Press the Up or Down Arrow button until the required value on the chart is selected, then press the
Forward Arrow button once to move the cursor to the next value that requires adjustment.
14. When the adjustments are complete, press OK.
15. Repeat step 9 to print and check the values.
16. If the columns of white are not centered on 0 (as much as possible), look at the chart and
determine the new correction values. Beginning with step 7, repeat the steps to continue making
adjustments until 0 is next to the column of white on the printed chart. The color registration
adjustment is complete when the columns of white are centered as much as possible on 0.
17. When finished, press the Menu
button to return to the main menu.