


Initial Configuration
13
NXA-ENET24 - Software Management Guide
Basic Configuration
Console Connection
The CLI program provides two different command levels — normal access level (Normal Exec) and privileged
access level (Privileged Exec). The commands available at the Normal Exec level are a limited subset of those
available at the Privileged Exec level and allow you to only display information and use basic utilities.
To fully configure switch parameters, you must access the CLI at the Privileged Exec level.
Access to both CLI levels are controlled by user names and passwords. The switch has a default user name and
password for each level. To log into the CLI at the Privileged Exec level using the default user name and
password, perform these steps:
1. To initiate your console connection, press <Enter>. The “User Access Verification” procedure starts.
2. At the Username prompt, enter “admin” (case-sensitive).
3. At the Password prompt, enter “1988” (password characters are not displayed on the console screen).
4. The session is opened and the CLI displays the “Console#” prompt indicating you have access at the
Privileged Exec level.
Setting Passwords
Passwords can consist of up to 8 alphanumeric characters and are case sensitive. To prevent unauthorized
access to the switch, set the passwords as follows:
1. Open the console interface with the default user name and password “admin” to access the Privileged
Exec level.
2. Type “configure” and press <Enter>.
3. Type “username guest password 0 password,” for the Normal Exec level, where password is your new
password. Press <Enter>.
4. Type “username admin password 0 password,” for the Privileged Exec level, where password is your
new password. Press <Enter>.
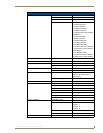
Username: admin
Password:
CLI session with the Intelligent Fast Ethernet PoE Switch is opened.
To end the CLI session, enter [Exit].
Console#configure
Console(config)#username guest password 0 [password]
Console(config)#username admin password 0 [password]
Console(config)#
Setting an IP Address
You must establish IP address information for the switch to obtain management access through the network.
This can be done in either of the following ways:
Manual: You have to input the information, including IP address and subnet mask. If your
management station is not in the same IP subnet as the switch, you will also need to specify the
default gateway router.
Dynamic: The switch sends IP configuration requests to BOOTP or DHCP address allocation
servers on the network.
The onboard program only provides access to basic configuration functions. To
access the full range of SNMP management functions, you must use SNMP-based
network management software.
If this is your first time to log into the CLI program, you should define new passwords
for both default user names using the “username” command, record them and put
them in a safe place.