


52-19
Cisco ASA 5500 Series Configuration Guide using ASDM
Chapter 52 Configuring the Cisco Phone Proxy
Configuring the Phone Proxy
• Non-secure—Specifies the cluster mode to be in nonsecure mode when configuring the Phone Proxy
feature.
• Mixed—Specifies the cluster mode to be in mixed mode when configuring the Phone Proxy feature.
Step 7 To configure the idle timeout after which the secure-phone entry is removed from the Phone Proxy
database (the default is 5 minutes), enter a value in the format hh:mm:ss.
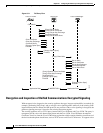
Since secure phones always request a CTL file upon bootup, the Phone Proxy creates a database that
marks the phone as secure. The entries in the secure phone database are removed after a specified
configured timeout. The entry timestamp is updated for each registration refresh the Phone Proxy
receives for SIP phones and KeepAlives for SCCP phones.
Specify a value that is greater than the maximum timeout value for SCCP KeepAlives and SIP Register
refresh. For example, if the SCCP KeepAlives are configured for 1 minute intervals and the SIP Register
Refresh is configured for 3 minutes, configure this timeout value greater than 3 minutes.
Step 8 To preserve Call Manager configuration on the IP phones, check the Preserve the Call Manager’s
configuration on the phone... check box. When this check box is uncheck, the following service settings
are disabled on the IP phones:
• PC Port
• Gratuitous ARP
• Voice VLAN access
• Web Access
• Span to PC Port
Step 9 To force Cisco IP Communicator (CIPC) softphones to operate in authenticated mode when CIPC
softphones are deployed in a voice and data VLAN scenario, check the Enable CIPC security mode
authentication check box.
Because CIPC requires an LSC to perform the TLS handshake, CIPC needs to register with the CUCM
in nonsecure mode using cleartext signaling. To allow the CIPC to register, create an ACL that allows
the CIPC to connect to the CUCM on the nonsecure SIP/SCCP signalling ports (5060/2000).
CIPC uses a different cipher when doing the TLS handshake and requires the null-sha1 cipher and SSL
encryption be configured. To add the null-shal cipher, go to Configuration > Device Management >
Advanced > SSL Settings > Encryption section. Select the null-shal SSL encryption type and add it to
the Available Algorithms.
Current versions of Cisco IP Communicator (CIPC) support authenticated mode and perform TLS
signaling but not voice encryption.
Step 10 To configure an HTTP proxy for the Phone Proxy feature that is written into the IP phone's configuration
file under the <proxyServerURL> tag, do the following:
a. Check the Configure a http-proxy which would be written into the phone’s config file... check box.
b. In the IP Address field, type the IP address of the HTTP proxy and the listening port of the HTTP
proxy.
The IP address you enter should be the global IP address based on where the IP phone and HTTP
proxy server is located. You can enter a hostname in the IP Address field when that hostname can
be resolved to an IP address by the ASA (for example, DNS lookup is configured) because the ASA
will resolve the hostname to an IP address. If a port is not specified, the default will be 8080.
c. In the Interface field, select the interface on which the HTTP proxy resides on the ASA.