


12-22
Cisco ASA 5500 Series Configuration Guide using ASDM
Chapter 12 Starting Interface Configuration (ASA 5510 and Higher)
Starting Interface Configuration (ASA 5510 and Higher)
For example, to take advantage of existing cabling, you would continue to use the formerly in-use
interfaces in their old roles as part of the inside and outside redundant interfaces:
context customerA
allocate-interface port-channel1 int1
allocate-interface port-channel2 int2
allocate-interface port-channel3 mgmt
context customerB
allocate-interface port-channel1
allocate-interface port-channel2
allocate-interface port-channel3
Note You might want to take this opportunity to assign mapped names to interfaces if you have not
done so already. For example, the configuration for customerA does not need to be altered at all;
it just needs to be reapplied on the ASA. The customerB configuration, however, needs to have
all of the interface IDs changed; if you assign mapped names for customerB, you still have to
change the interface IDs in the context configuration, but mapped names might help future
interface changes.
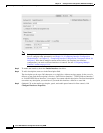
Step 7 For contexts that do not use mapped names, change the context configuration to use the new
EtherChannel or redundant interface ID. (Contexts that use mapped interface names do not require any
alteration.)
For example:
CustomerB Context
interface port-channel1
nameif outside
security-level 0
ip address 10.20.15.5 255.255.255.0
!
interface port-channel2
nameif inside
security-level 100
ip address 192.168.6.78 255.255.255.0
!
interface port-channel3
nameif mgmt
security-level 100
ip address 10.8.1.8 255.255.255.0
management-only
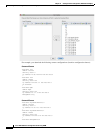
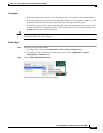
Step 8 Copy the new context configuration files over the old ones. For example, for contexts in flash memory,
in the system choose Tools > File Management, then choose File Transfer > Between Local PC and
Flash. This tool lets you choose each configuration file and copy it to your local computer. This change
only affects the startup configuration; the running configuration is still using the old context
configuration.
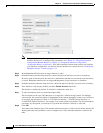
Step 9 Copy the entire new system configuration to the clipboard, including the altered interface section.
Step 10 In ASDM, choose Tools > Command Line Interface, and click the Multiple Line radio button.
Step 11 Enter clear configure all as the first line, paste the new configuration after it, and click Send. The clear
command clears the running configuration (both system and contexts), before applying the new
configuration.
Traffic through the ASA stops at this point. All of the new context configurations now reload. When they
are finished reloading, traffic through the ASA resumes.