


25-9
Cisco ASA 5500 Series Configuration Guide using ASDM
Chapter 25 Configuring Static and Default Routes
Feature History for Static and Default Routes
Step 2 Choose Management from the Interfaces drop-down list.
Step 3 Enter 10.1.1.0 in the IP Address field.
Step 4 Choose 255.255.255.0 from the Mask drop-down list.
Step 5 Enter 10.1.2.45 1 in the Gateway IP field.
A static route is created that sends all traffic destined for 10.1.1.0/24 to the router 10.1.2.45, which is
connected to the inside interface.
Step 6 Click OK.
Step 7 Choose Configuration > Device Setup > Routing > Static Routes.
Step 8 Click Add.
Step 9 Enter the IP Address in the IP Address field for the destination network.
In this case, the route IP addresses are: 192.168.2.1, 192.168.2.2, 192.168.2.3, and 192.168.2.4. When
adding 192.168.2.4, click the Tunneled radio button in the Options area.
Step 10 Enter the Gateway IP Address in the Gateway IP Address field for the address of the next hop router.
The addresses you specify for the static route are the addresses that are in the packet before entering the
ASA and performing NAT.
Step 11 Choose the netmask for the destination network from the NetMask drop-down list.
Step 12 Click OK.
Feature History for Static and Default Routes
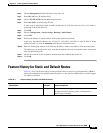
Table 25-1 lists each feature change and the platform release in which it was implemented. ASDM is
backwards-compatible with multiple platform releases, so the specific ASDM release in which support
was added is not listed.
Table 25-1 Feature History for Static and Default Routes
Feature Name
Platform
Releases Feature Information
Routing 7.0(1) Static and default routing were introduced.
We introduced the following screen: Configuration >
Device Setup > Routing.