


7-16
Cisco ASR 1001-X Router Hardware Installation Guide
OL-32376-02
Chapter 7 Removing and Replacing FRUs from the Cisco ASR 1001-X Router
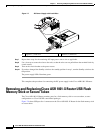
Removing and Replacing a Cisco ASR 1001-X Router SPA
• Always use an ESD wrist strap or ankle strap when installing or replacing a Cisco ASR 1001-X SPA.
Ensure that the ESD strap makes contact with your skin.
• Handle the Cisco ASR 1001-X SPA by its metal carrier edges and handles; avoid touching the
printed circuit board or any connector pins.
• When removing the Cisco ASR 1001-X SPA, place it on an antistatic surface with the printed circuit
board components facing upward, or in a static shielding bag.
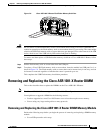
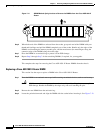
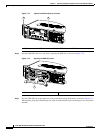
Removing a Shared Port Adapter
To remove a SPA, follow these steps.
Step 1 Attach an ESD wrist strap between you and an unpainted chassis surface.
Step 2 Stop the SPA so that there is no traffic running through the SPA when it is removed.
Caution Removing a SPA while traffic is flowing through the ports may cause system disruption.
Refer to the following example to stop the SPA in the SPA bay 0/1:
a. At the router# prompt, enter hw-module subslot 0/1 stop and press Enter.
b. At the router# prompt, enter end and press Enter.
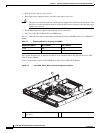
Step 3 Disconnect all the cables from the SPA.
Step 4 Unscrew the captive installation screws on either side of the SPA.
Step 5 Grasp the handles with both hands and pull the SPA.
You have completed the Cisco ASR 1001-X Router SPA removal procedure.
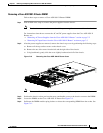
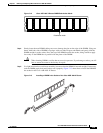
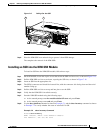
Replacing a Shared Port Adapter
To replace a SPA, follow these steps:
Step 1 To insert a SPA, locate the guide rails that hold the SPA in place. They are at the top left and top right
of the SPA slot and are recessed about an inch.
Step 2 Carefully slide the SPA all the way in using both hands until the SPA is firmly seated in the SPA interface
connector. When fully seated, the SPA might be slightly behind the faceplate.
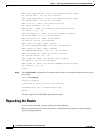
Step 3 After the SPA is properly seated, fasten the SPA in place with the captive installation screws on either
side of the SPA.
Note Ensure that you fasten the captive installation screws to provide appropriate connectivity.
Step 4 Restart the SPA using the following steps:
a. At the router# prompt, enter hw-module subslot 0/1 start and press Enter.
b. At the router# prompt, enter end and press Enter.