


3-19
Cisco ASR 1001-X Router Hardware Installation Guide
OL-32376-02
Chapter 3 Preparing Your Site for Installation
Tools and Equipment
• Do not remove installed components from the chassis.
• Always disconnect all external cables before lifting or moving the chassis.
Tools and Equipment
The following tools and equipment are recommended as the minimum necessary equipment to install the
Cisco ASR 1001-X Router. You may need additional tools and equipment to install associated equipment
and cables. You may also require test equipment to check electronic and optical signal levels, power
levels, and communications links.
• Phillips hand screwdriver
• 3.5-mm flat-blade screwdriver
• Tape measure (optional)
• Level (optional)
• Power drill
• 8-gauge wire
• Rack-mount brackets
• Cable-management brackets
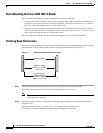
Unpacking and Verifying Shipping Contents
When you receive your chassis, perform the following steps and use the shipping contents checklist from
“Checking the Shipping Container Contents” section on page 3-19.
Step 1 Inspect the box for any shipping damage. (If there is damage, contact your Cisco service representative).
Step 2 Unpack the Cisco ASR 1001-X Router.
Step 3 Perform a visual inspection of the chassis.
Step 4 After you have unpacked the system, verify that you have received all of the required components,
including all the accessory items. Using the packing list as a guide, verify that you have received all the
equipment listed in your order, and ensure that the configuration matches the packing list.
Checking the Shipping Container Contents
Use the components list shown in Table 3-7 to check the contents of the Cisco ASR 1001-X Router
shipping container. Do not discard the shipping container. You need the container if you move or have
to ship the Cisco ASR 1001-X Router in the future.