


4-6
Cisco ASR 1001-X Router Hardware Installation Guide
OL-32376-02
Chapter 4 Cisco ASR 1001-X Router Installation
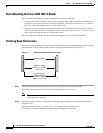
General Guidelines for Rack Installation
This completes the steps for attaching the front rack-mount brackets to the Cisco ASR 1001-X Router.
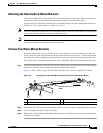
Mounting the Cisco ASR 1001-X Router in the Rack
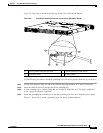
After installing the rack-mount brackets on the chassis, mount the chassis by securing the rack-mount
brackets to two posts or mounting strips in the rack using the screws provided. Because the rack-mount
brackets support the weight of the entire chassis, ensure that you use all the screws to fasten the two
rack-mount brackets to the rack posts.
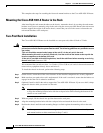
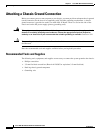
Two-Post Rack Installation
The Cisco ASR 1001-X Router can be installed on a two-post rack, either 19 inch or 23 inch.
Warning
To prevent bodily injury when mounting or servicing this unit in a rack, you must take special
precautions to ensure that the system remains stable. The following guidelines are provided to ensure
your safety:
-This unit should be mounted at the bottom of the rack if it is the only unit in the rack.
-When mounting this unit in a partially filled rack, load the rack from the bottom to the top with the
heaviest component at the bottom of the rack.
-If the rack is provided with stabilizing devices, install the stabilizers before mounting or servicing
the unit in the rack.
Statement 1006
We recommend that you allow at least 1 or 2 inches (2.54 or 5.08 cm) of vertical clearance between the
router and any equipment directly above and below it.
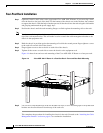
To install the chassis in the rack, perform the following steps:
Step 1 On the chassis, ensure that all the screw fasteners on the installed components are securely tightened.
Step 2 Make sure that your path to the rack is unobstructed. If the rack is on wheels, ensure that the brakes are
engaged or that the rack is otherwise stabilized.
Step 3 (Optional) Install a shelf in the rack to support the Cisco ASR 1001-X Router. If you use a shelf, it helps
support the chassis while you secure it to the rack.
Note If you are using a shelf, place the chassis on the shelf and slightly raise the front of the chassis
to align the mounting bracket holes with the rack post holes while allowing the bottom of the
chassis to rest on the shelf.
Step 4 With two people, lift the chassis into position between the rack posts.
Step 5 Align the mounting bracket holes with the rack post holes and attach the chassis to the rack.
Step 6 Position the chassis until the rack-mounting flanges are flush against the mounting rails on the rack.
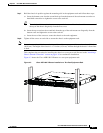
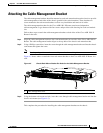
Tip To allow space to attach the cable-management brackets to the chassis in the rack easily, use the
rack-mount bracket ear holes mentioned in Steps 7 and 8.