


www.kodak.com/go/aiosupport 7
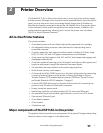
Kodak ESP 9 All-in-One printer
NOTE: See Adjusting the control panel position, page 9 for instructions on raising
and lowering the control panel so that it is easier to use.
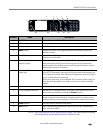
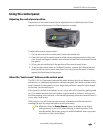
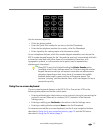
Number Name Description
1
On/Off button Powers the printer ON or OFF.
2 LCD screen Displays photos, messages, status, on-screen keyboard, and menus.
3 Attention light Blinks or flashes when an error occurs.
4
Menu button Displays the menu, and toggles between parameters screens and
preview screens.
5
Cancel button Cancels the current operation and control panel navigation, and
returns you to the menu.
6 Cap-sense (touch-sense)
number keypad
Dials a fax telephone number or Quick Dial number; can be used to
enter information and Quick Dial setting into the Fax Phonebook,
specify quantity for making copies, and entering information used to
authenticate access to a network.
7 Wireless (Wi-Fi) network
status light
When lit, signals that a wireless (Wi-Fi) network connection is active.
If the LED is illuminated, you may not be connected to the network yet.
Go to Network Settings, View Network Configuration, and verify that it
says it is Network and Connected.
Blinks when searching for an available Wi-Fi network within range, or
when the existing signal is too weak to transmit or receive wireless
signals.
8 Ethernet network icon Label only. Does not shine.
9 4-way navigation buttons Enables you to navigate menus. Also used to pan around and crop a
photo when activated by pressing the
Zoom+ button.
10
OK button Enables you to complete a menu selection or photo print command,
accept a current zoom setting for cropping a photo, or allows you to
continue with the current operation. Also used to select menu items.
11
Zoom buttons Lets you zoom in and out of the photo.
12
Start button Starts the following operations: copy, scan, print, fax, maintenance
tasks, and file transfer.
1
2
891011 12
34 5 6
7