


www.kodak.com/go/aiosupport 51
Kodak ESP 9 All-in-One printer
NOTE: If Tagged Image Printing is enabled on this printer (see Configuring printer
settings, page 21), it detects a Digital Print Order Format (DPOF) file when
you insert a memory card. The printer LCD screen prompts you to verify that
you want to print tagged images. See Printing tagged images, page 55.
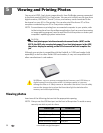
Most memory cards will work with this printer. When you insert a memory card, or
connect a camera or portable flash drive to the printer, the last photo taken is
displayed first.
CAUTION:
Do not insert more than one device, such as a USB thumb drive or memory
card, into the printer at a time, or you will get an error message. Also, never
remove or disconnect a memory card from its slot unless the blue light near
the slot is not blinking.
NOTE: Photos stored on a PictBridge camera are displayed on the camera’s LCD
screen only. See Printing photos from a PictBridge camera, page 53, as
needed.
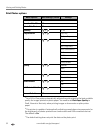
Configuring photo print settings
You can change the factory default print settings for your printer using the control
panel. Windows users may adjust some settings using Home Center software (see
Home Center Help, discussed in All-in-One printer Home Center software, page 19,
for information on using Home Center).
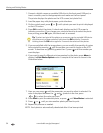
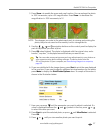
1. Insert a memory card into the appropriate slot, or plug a USB flash drive or
digital camera to the front panel USB port. The last photo is displayed first.
2. From the control panel, press
Menu.
3. Press until the option you want to configure is selected, and then press
OK.
4. As needed, press or to change the setting.
5. Press
OK to save the setting for the current print job.
6. To save the setting as the default value, select
Save as Default and press OK.
7. As needed, press or until
View Photos is selected in the Print Photos menu,
and then press
OK to return to viewing and selecting photos for printing. Or,
press
Start to print the selected photo(s) with the selected settings.