3. Carefully open the retaining clip on each end of the ServeRAID 8k-l adapter
connector and remove the adapter from the server.
4. If you are instructed to return the adapter, follow all packaging instructions, and
use any packaging materials for shipping that are supplied to you.
Installing the RAID 8k-l adapter
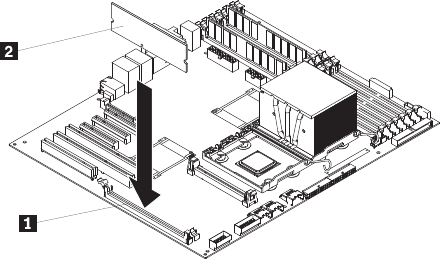
The IBM ServeRAID 8k-l adapter must be installed in its dedicated connector on the
system board. See the following illustration for the location of the connector on the
system board. The ServeRAID 8k-l adapter is not cabled to the system board and
no rerouting of the SCSI cable is required.
To install the ServeRAID 8k-l adapter, complete the following steps:
1. Read the safety information beginning on page “Safety” on page vii, and
“Installation guidelines” on page 73.
2. Turn off the server and peripheral devices, and disconnect the power cords
and all external cables. Remove the side cover (see “Removing the side cover”
on page 78.
Attention: To avoid breaking the retaining clips or damaging the
ServeRAID-8k-l adapter connector, open and close the clips gently.
3. Open the retaining clip on each end of the ServeRAID 8k-l adapter connector
1.
4. Touch the static-protective package containing the ServeRAID 8k-l adapter 2
to any unpainted metal surface on the server. Then, remove the ServeRAID
8k-l adapter from the package.
5. Turn the ServeRAID 8k-l adapter so that the ServeRAID 8k-l adapter keys
align correctly with the connector.
Attention: Incomplete insertion might cause damage to the system board or
the ServeRAID 8k-l adapter.
6. Press the ServeRAID 8k-l adapter firmly into the connector.
7. If you have other options to install or remove, do so now.
8. Replace the side cover (see “Installing the side cover” on page 79).
9. Lock the side cover.
10. Reconnect the external cables and power cords; then, turn on the attached
devices and turn on the server.
Removing the RAID-8k adapter
The ServeRAID-8k adapter can be installed only in its dedicated connector on the
system board. See the following illustration for the location of the connector 2 on
116 ThinkServer TD100 and TD100x: Hardware Maintenance Manual
