


DM800™, DM900™ Digital Mailing System Operating Guide
SV60861 Rev. F 7-7
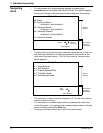
Turning
Standard
Ac
counting
On or Off
To turn the standard accounting package provided with your system on or
off:
1. Press the Accounts
key.
2. Press the right arrow key to enter the “Set Up Accounts” screen.
3. Scroll down and select Accounting
.
4. To turn on the system’s standard accounting, select St
andard. To dis-
able or turn off standard accounting, select Off.
Deleting
Accounts
When you delete an account, you remove its data completely. That data is
then unrecoverable. Make sure you do not need the account’s data before
you delete the account.
1. Press the Account
s
key.
2. Press the right arrow key to enter the “Set Up Account” screen.
3. Scroll down and select Delete Account.
4.
A list of your accounts appear. You can only select a chargeable
account to d
elete. The selected account, subaccount and/or subsub-
acount, along with its postage and pieces of mail is deleted.
5. As soon as you select an account, the system prompts you to print a
rep
ort. Once you d
elete an account, its data cannot be retrieved. To
keep a record or your account data, select Print Report, then select
Delete.
Turning
Account
Password
Protection
On or
Of
f
By turning passwords on, you can protect each account from unauthorized
access.
To turn account passwords on or off:
1. Press the Accounts
key.
2. Press the right arrow key to enter the “Set Up Account” screen.
3. Scroll down and select Passwords.
By selecting Passwords, you can switch between On and Off.
5
NOTE: If your system is connected to other accounting systems, those sys-
tems also appear as options. Refer to Select
ing an Accounting Type in this
chapter for more information.
6
EXAMPLE:
The subaccounts appear in the display as two separate accounts under the
main account title:
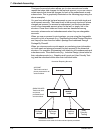
Engineering
Software
Engineering
Industrial Design
7
NOTE: Before you can turn account password protection on or off, you need
enable the supervisor password protection feature. Refer to Setting up a Super
-
visor Password in Chap
ter 4 of this guide for more information.