


First operation steps Step 1: program output voltage and current
5
First operation
steps
This chapter will guide you through the first steps of manually programming the
XMP 2600 power supply system. Before reading this chapter you need to familiarize
yourself with the description of the front panel that was presented in the previous
chapter.
Step 1: program output voltage and current
To start with, you will leave all other power module parameters at their default
values and program a power module for the desired output voltage and current.
Select a
power
module
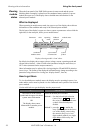
First you need to select the power module you wish to program. To do that, you
need to make sure the front panel is in the status operating mode.
Start from status mode
Make sure the cursor (blinking black rectangle) is at one of the following positions:
♦ The cursor is at the system symbol (“Σ”) and the upper row of the display
shows the global power supply status (the display will be in that state
following turn on).
♦ The cursor is at one of the condensed power module status symbols and the
upper row of the display shows power module status information.
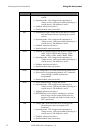
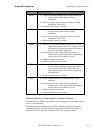
Use the table below if you need to get the display to the state described above:
IF… Take the action…
Operating in programming mode
(an underline cursor is visible at
the upper row of the display)
Press the
SET key to exit programming
mode.
The cursor is at the system
symbol but the upper row shows
other information.
Press the
SYSTEM key, examine the
information on the upper row of the display
and act accordingly.
The cursor is at the system
symbol but the upper row reads:
“Power Supply Set Up”
Press the
SET key to exit the setup mode
and return to status mode.
XMP 2600 User’s Guide
rev. 1.0 37