


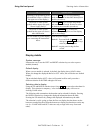


First operation steps Step 1: program output voltage and current
How to get there
While in status mode, select the module, and click the SET key to enter
programming mode.
Display details
System message
Instructs the user to use the LEFT and RIGHT selection keys to select an item to
change: voltage, current or foldback selection.
Values to program
The left side of the display shows the name of the parameter being modified along
with its associated value(s). In this instance we are programming SET values:
desired output voltage and current.
Entry guidance
The right side of the display shows the parameter (and its value) that is limiting the
value that we can enter for the item selected by the cursor. In the example shown,
the LIM voltage value is limiting the value that can be programmed for the SET
voltage.
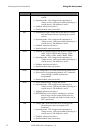
Enter voltage
and current
values
There are two methods (with variations) available for changing numeric values. For
now you should use the simplest approach, demonstrated below.
Enter desired output voltage
Using the numeric entry keys, enter the desired value, noting the following:
♦ You do not have to enter leading zeros. If, for example, the power module can
be programmed up to 18.00 volts and you wish to program it to 4 volts – just
enter 4 and not 04.
♦ When you click the decimal point key, the entered value is aligned with the
correct dot position.
♦ You may delete the last digit using the DEL key.
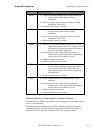
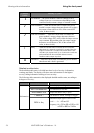
When you are done with the value for voltage, one of two things may happen:
The value occupies the entire voltage field and the
cursor has already moved to the value for current.
OR
You will need to press the
ENTER key to confirm the
value for voltage and move the cursor to the value for
current.
Note how the entry guidance message is changed as well.
A more complete description of numeric entry is presented in the
next chapter.
XMP 2600 User’s Guide
rev. 1.0 39