


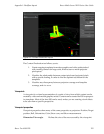


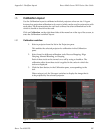
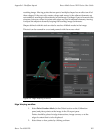


5. Use arrow keys to position more accurately the real position of the
target.
6. Press enter to validate, once the position is properly set.
7. Repeat steps 3 through 6 until atleast six targets have been positioned.
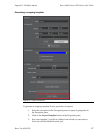
8.
Check Enable Live Calibration to calculate the real position of the
projector and to adjust its output to match the targets.
9. If needed—move the targets until the projected image of the projector
matches as closely as possible the geometry upon which it is being
projected.
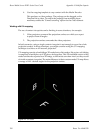
This maytake manypasses to perfect.Selecting atargeton thegeometry
is done by clicking it. Selected targets are shown as red, unselected
ones are shown as blue.
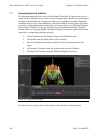
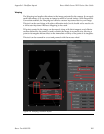
10. If needed—add more targets to fine tune the calibration.
Click Creation Target Mode and place additional targets on the geo-
metry. These targets can then be moved the same way as the initially
created targets.
If you need to delete a target, select it and press the Del key.
Right clicking with the mouse temporarily shows an all-white image, to help with cal-
ibration.
Note
A minimum of sixpoints must be set before Reverse Mappingcan be calcu-
lated.
Tip
When choosing the calibration points, follow these simple tips to make the
calibration as efficient as possible:
• Avoid choosing points lying in the same depth, the more
depth amplitude you have for your points, the easier the
calibration will be.
• Do not add too many points. The more points you add, the
less influence each point has when being dragged. You
should beable tocalibrateefficiently withsix orseven points.
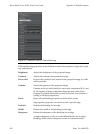
Reverse Mapping controls
When not enabled, the following options can be set.
Show Points
Toggles between showing and not showing the target points
Reset
Removes all the target points
163Barco Pn: 60600320
Barco Media Server XHD-Series User GuideAppendix I: Workflow layouts