


6 - 8
SETUP SEND
Composing Your Own Comments
You can set up two custom comments.
1
Press Function, 1, 3, 2.
2
Press or to choose position 5 or 6 for your customized comment
and press Set.
3
Use the dial pad to enter your customized comment and press Set.
(See
Entering Text, page 4-2.)
4
Press 1 if you want to select additional settings. The LCD returns to the SETUP
SEND menu—OR—Press 2 to exit.
Cover Page For Next Fax Only
You can set the fax to send a cover page with a particular fax. This cover page
will include the number of pages in your original.
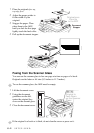
1
Place the original face up in the ADF, or face down on the scanner glass.
2
Press Function, 1, 3, 1.
3
When the screen displays NEXT FAX ONLY?, press Set.
4
Press or to select ON (or OFF) and press Set.
5
Press or to select one of the standard or custom comments
and press Set.
6
Enter two digits to indicate the number of pages you are sending, and press Set.
(Enter 0 0 to leave the number of pages blank.) If you make a mistake, press
to back up and re-enter the number of pages.
7
Press 1 if you want to select additional settings. The LCD returns to the SETUP
SEND menu—OR—Press 2 if you are finished choosing settings, and go to
Step 8.
8
Enter the fax number you’re calling.
9
Press Start.
Always Send Cover Page
Make sure Station ID is set up. (See page 4-1.) This feature does not work
without the Station ID.
You can set the MFC to send a cover page whenever you send a fax. The number
of pages in your fax is not included when you use this setting.
1
Press Function, 1, 3, 1.
2
Press or to select COVERPAGE:ON? and press Set.
Note
Make sure the Station ID is set up. (See page 4-1.) This feature does not work
without the Station ID.