


6-23
Cisco ASA Series Firewall ASDM Configuration Guide
Chapter 6 Configuring NAT (ASA 8.2 and Earlier)
Using Dynamic NAT
Step 2 For a new pool, from the Interface drop-down list, choose the interface where you want to use the
mapped IP addresses.
Step 3 For a new pool, in the Pool ID field, enter a number between 1 and 2147483647. Do not enter a pool ID
that is already in use, or your configuration will be rejected.
Step 4 In the IP Addresses to Add area, click Range, Port Address Translation (PAT), or PAT Address
Translation (PAT) Using IP Address of the interface.
If you specify a range of addresses, the ASA performs dynamic NAT. If you specify a subnet mask in
the Netmask field, the value specifies the subnet mask assigned to the mapped address when it is
assigned to a host. If you do not specify a mask, then the default mask for the address class is used.
Step 5 Click Add to add the addresses to the Addresses Pool pane.
Step 6 (Optional) You can add multiple addresses to the global pool. If you want to add a PAT address after you
configure a dynamic range, for example, then complete the value for PAT and click Add again. See the
“Multiple Addresses in the Same Global Pool” section on page 6-20 for information about using
multiple addresses on the same pool ID for an interface.
Step 7 Click OK.
Configuring Dynamic NAT, PAT, or Identity NAT
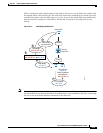
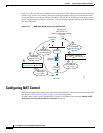
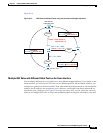
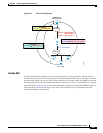
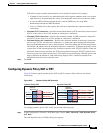
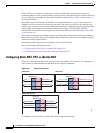
Figure 6-19 shows typical dynamic NAT, dynamic PAT, and identity NAT scenarios. Only real hosts can
initiate connections.
Figure 6-19 Dynamic NAT Scenarios
10.1.1.1 209.165.201.1
Inside Outside
10.1.1.2 209.165.201.2
Security
Appliance
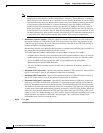
10.1.1.1:1025 209.165.201.1:2020
Inside Outside
10.1.1.1:1026 209.165.201.1:2021
10.1.1.2:1025 209.165.201.1:2022
Security
Appliance
Dynamic NAT
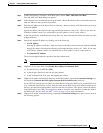
Identity NAT
Dynamic PAT
209.165.201.1 209.165.201.1
Inside Outside
209.165.201.2 209.165.201.2
Security
Appliance
191658