


17-17
Cisco ASA Series Firewall ASDM Configuration Guide
Chapter 17 Configuring the Cisco Phone Proxy
Configuring the Phone Proxy
Step 6 (Optional) In the Domain Name field, specify the domain name of the trustpoint used to create the DNS
field for the trustpoint. This is appended to the Common Name field of the Subject DN to create the DNS
Name. The domain name should be configured when the FQDN is not configured for the trustpoint. Only
one domain-name can be specified.
Note If you are using domain names for your CUCM and TFTP server, you must configure DNS lookup on
the ASA. Add an entry for each of the outside interfaces on the ASA into your DNS server, if such entries
are not already present. Each ASA outside IP address should have a DNS entry associated with it for
lookups. These DNS entries must also be enabled for Reverse Lookup. Additionally, define your DNS
server IP address on the ASA; for example:
dns name-server 10.2.3.4 (IP address of your DNS
server).
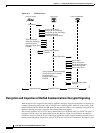
Creating the Media Termination Instance
Create the media termination instance that you will use in the phone proxy.
The media termination address you configure must meet the requirements as described in Media
Termination Instance Prerequisites, page 17-6.
Note In versions before 8.2(1), you configured one media-termination address (MTA) on the outside interface
of the adaptive security appliance where the remote Cisco IP phones were located. In Version 8.2(1) and
later, you can configure a global media-termination address for all interfaces or configure a
media-termination address for different interfaces.
As a result of this enhancement, the old configuration has been deprecated. You can continue to use the
old configuration if desired. However, if you need to change the configuration at all, only the new
configuration method is accepted; you cannot later restore the old configuration. If you need to maintain
downgrade compatibility, you should keep the old configuration as is.
Step 1 Open the Configuration > Firewall > Unified Communications > Media Termination Address pane.
Step 2 Check the Enable Media Termination Address check box to enable the feature.
Step 3 In the Media Termination Address Settings area, specify whether to configure a media-termination
address (MTA) per interface or to configure a global MTA. You can configure a global
media-termination address for all interfaces or configure a media-termination address for different
interfaces.
• To configure an MTA per interface, click the Configure MTA per Interface radio button and click
the Add button. In the dialog box that appears, specify the interface name and enter an IP address
or hostname.
If you configure a media termination address for multiple interfaces, you must configure an address
on each interface that the ASA uses when communicating with IP phones. The IP addresses are
publicly routable addresses that are unused IP addresses within the address range on that interface.
See Media Termination Instance Prerequisites, page 17-6 for the complete list of requirements that
you must follow when creating the media termination instance and configuring the media
termination addresses.
• To configure a global MTA, click the Configure global MTA on interface radio button and enter the
IP address in the text box. See Media Termination Instance Prerequisites, page 17-6 for the complete
list of requirements that you must follow when configuring a global media termination address.