


6-26
Cisco ASA Series Firewall ASDM Configuration Guide
Chapter 6 Configuring NAT (ASA 8.2 and Earlier)
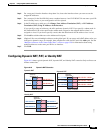
Using Dynamic NAT
Step 2 In the Original area, from the Interface drop-down list, choose the interface that is connected to the hosts
with real addresses that you want to translate.
Step 3 Enter the real addresses in the Source field, or click the ... button to choose an IP address that you already
defined in ASDM.
Specify the address and subnet mask using prefix/length notation, such as 10.1.1.0/24. If you enter an
IP address without a mask, it is considered to be a host address, even if it ends with a 0.
Separate multiple real addresses by a comma.
Step 4 Enter the destination addresses in the Destination field, or click the ... button to choose an IP address
that you already defined in ASDM.
Specify the address and subnet mask using prefix/length notation, such as 10.1.1.0/24. If you enter an
IP address without a mask, it is considered to be a host address, even if it ends with a 0.
Separate multiple destination addresses by a comma.
By default, the field shows any, which allows any destination address.
Step 5 To choose a global pool, use one of the following options:
• Choose an already-defined global pool.
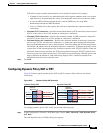
If the pool includes a range of addresses, then the ASA performs dynamic NAT. If the pool includes
a single address, then the ASA performs dynamic PAT. If a pool includes both ranges and single
addresses, then the ranges are used in order, and then the PAT addresses are used in order. See the
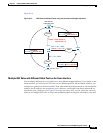
“Multiple Addresses in the Same Global Pool” section on page 6-20 for more information.
Pools are identified by a pool ID. If multiple global pools on different interfaces share the same pool
ID, then they are grouped. If you choose a multi-interface pool ID, then traffic is translated as
specified when it accesses any of the interfaces in the pool. For more information about pool IDs,
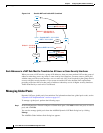
see the “Dynamic NAT Implementation” section on page 6-17.
• Create a new global pool or edit an existing pool by clicking Manage. See the “Managing Global
Pools” section on page 6-22.
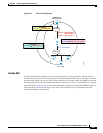
• Choose identity NAT by choosing global pool 0.
Step 6 (Optional) Enter a description in the Description field.
Step 7 (Optional) To enable translation of addresses inside DNS replies, expand the Connection Settings area,
and check the Translate the DNS replies that match the translation rule check box.
If your NAT rule includes the real address of a host that has an entry in a DNS server, and the DNS server
is on a different interface from a client, then the client and the DNS server need different addresses for
the host; one needs the mapped address and one needs the real address. This option rewrites the address
in the DNS reply to the client. The mapped host needs to be on the same interface as either the client or
the DNS server. Typically, hosts that need to allow access from other interfaces use a static translation,
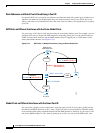
so this option is more likely to be used with a static rule. See the “DNS and NAT” section on page 6-14
for more information.
Step 8 (Optional) To enable connection settings, expand the Connection Settings area, and set one or more of
the following options: