


8-12
Cisco ASA Series Firewall ASDM Configuration Guide
Chapter 8 Configuring AAA Rules for Network Access
Configuring Authorization for Network Access
Configuring Authorization for Network Access
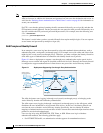
After a user authenticates for a given connection, the ASA can use authorization to further control traffic
from the user.
This section includes the following topics:
• Configuring TACACS+ Authorization, page 8-12
• Configuring RADIUS Authorization, page 8-13
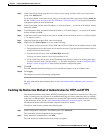
Configuring TACACS+ Authorization
You can configure the ASA to perform network access authorization with TACACS+. Authentication and
authorization statements are independent; however, any unauthenticated traffic matched by an
authorization rule will be denied.For authorization to succeed:
1. A user must first authenticate with the ASA.
Because a user at a given IP address only needs to authenticate one time for all rules and types, if
the authentication session has not expired, authorization can occur even if the traffic is not matched
by an authentication rule.
2. After a user authenticates, the ASA checks the authorization rules for matching traffic.
3. If the traffic matches the authorization rule, the ASA sends the username to the TACACS+ server.
4. The TACACS+ server responds to the ASA with a permit or a deny for that traffic, based on the user
profile.
5. The ASA enforces the authorization rule in the response.
See the documentation for your TACACS+ server for information about configuring network access
authorizations for a user.
To configure TACACS+ authorization, perform the following steps:
Step 1 Enable authentication. For more information, see the “Configuring Network Access Authentication”
section on page 8-6. If you have already enabled authentication, continue to the next step.
Step 2 In the Configuration > Firewall > AAA Rules pane, choose Add > Add Authorization Rule.
The Add Authorization Rule dialog box appears.
Step 3 In the Interface drop-down list, choose the interface for applying the rule.
Step 4 In the Action field, click one of the following, depending on the implementation:
• Authorize
• Do not Authorize
Step 5 In the AAA Server Group drop-down list, choose a server group. To add a AAA server to the server
group, click Add Server.
Only TACACS+ servers are supported.
Step 6 In the Source field, add the source IP address, or click the ellipsis (...) to choose an IP address already
defined in ASDM.
Step 7 In the Destination field, enter the destination IP address, or click the ellipsis (...) to choose an IP address
already defined in ASDM.