


1-14
Cisco ASA Series Firewall ASDM Configuration Guide
Chapter 1 Configuring a Service Policy
Adding a Service Policy Rule for Management Traffic
Identify the traffic using one of several criteria:
–
Source and Destination IP Address (uses ACL)—The class matches traffic specified by an
extended ACL. If the ASA is operating in transparent firewall mode, you can use an EtherType
ACL.
Note When you create a new traffic class of this type, you can only specify one access control
entry (ACE) initially. After you finish adding the rule, you can add additional ACEs by
adding a new rule to the same interface or global policy, and then specifying Add rule
to existing traffic class on the Traffic Classification dialog box (see below).
–
TCP or UDP Destination Port—The class matches a single port or a contiguous range of ports.
Tip For applications that use multiple, non-contiguous ports, use the Source and Destination IP
Address (uses ACL) to match each port.
• Add rule to existing traffic class. If you already have a service policy rule on the same interface,
or you are adding to the global service policy, this option lets you add an ACE to an existing ACL.
You can add an ACE to any ACL that you previously created when you chose the Source and
Destination IP Address (uses ACL) option for a service policy rule on this interface. For this traffic
class, you can have only one set of rule actions even if you add multiple ACEs. You can add multiple
ACEs to the same traffic class by repeating this entire procedure. See the “Managing the Order of
Service Policy Rules” section on page 1-15 for information about changing the order of ACEs.
• Use an existing traffic class. If you created a traffic class used by a rule on a different interface,
you can reuse the traffic class definition for this rule. Note that if you alter the traffic class for one
rule, the change is inherited by all rules that use that traffic class. If your configuration includes any
class-map commands that you entered at the CLI, those traffic class names are also available
(although to view the definition of the traffic class, you need to create the rule).
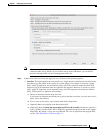
Step 6 Click Next.
Step 7 The next dialog box depends on the traffic match criteria you chose.
• Source and Destination Address—This dialog box lets you set the source and destination addresses:
a. Click Match or Do Not Match.
The Match option creates a rule where traffic matching the addresses have actions applied. The
Do Not Match option exempts the traffic from having the specified actions applied. For
example, you want to match all traffic in 10.1.1.0/24 and apply connection limits to it, except
for 10.1.1.25. In this case, create two rules, one for 10.1.1.0/24 using the Match option and one
for 10.1.1.25 using the Do Not Match option. Be sure to arrange the rules so that the Do Not
Match rule is above the Match rule, or else 10.1.1.25 will match the Match rule first.
b. In the Source field, enter the source IP address, or click the ... button to choose an IP address
that you already defined in ASDM.
Specify the address and subnet mask using prefix/length notation, such as 10.1.1.0/24. If you
enter an IP address without a mask, it is considered to be a host address, even if it ends with a 0.
Enter any to specify any source address.
Separate multiple addresses by a comma.
c. In the Destination field, enter the destination IP address, or click the ... button to choose an IP
address that you already defined in ASDM.