


31-13
Cisco ASA Series Firewall ASDM Configuration Guide
Chapter 31 Configuring the ASA IPS Module
Configuring the ASA IPS module
(ASA 5510 and Higher) Configuring Basic Network Settings
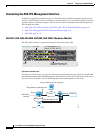
In single context mode, you can use the Startup Wizard in ASDM to configure basic IPS network
configuration. These settings are saved to the IPS configuration, not the ASA configuration.
In multiple context mode, session to the module from the ASA and configure basic settings using the
setup command.
Note (ASA 5512-X through ASA 5555-X) If you do not see the IPS Basic Configuration screen in your
wizard, then the IPS module is not running. See the “(ASA 5512-X through ASA 5555-X) Booting the
Software Module” section on page 31-12, and then repeat this procedure after you install the module.
Detailed Steps—Single Mode
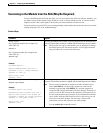
Step 1 Choose Wizards > Startup Wizard.
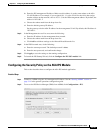
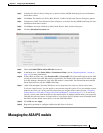
Step 2 Click Next to advance through the initial screens until you reach the IPS Basic Configuration screen.
Step 3 In the Network Settings area, configure the following:
• IP Address—The management IP address. By default, the address is 192.168.1.2.
• Subnet Mask—The subnet mask for the management IP address.
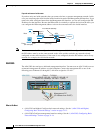
• Gateway—The IP address of the upstream router. The IP address of the next hop router. See the
“Connecting the ASA IPS Management Interface” section on page 31-8 to understand the
requirements for your network. The default setting of the ASA management IP address will not
work.
• HTTP Proxy Server—(Optional) The HTTP proxy server address. You can use a proxy server to
download global correlation updates and other information instead of downloading over the Internet.
• HTTP Proxy Port—(Optional) The HTTP proxy server port.
• DNS Primary—(Optional) The primary DNS server address. If you are using a DNS server, you
must configure at least one DNS server and it must be reachable for global correlation updates to be
successful.
For global correlation to function, you must have either a DNS server or an HTTP proxy server
configured at all times. DNS resolution is supported only for accessing the global correlation update
server.
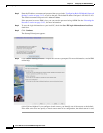
Step 4 In the Management Access List area, enter an IP address and subnet mask for any hosts that are allowed
to access the IPS management interface, and click Add. You can add multiple IP addresses.
Step 5 In the Cisco Account Password area, set the password for the username cisco and confirm it. The
username cisco and this password are used for Telnet sessions from hosts specified by the management
ACL and when accessing the IPS module from ASDM (Configuration > IPS). By default, the password
is cisco.
Step 6 In the Network Participation area, which you use to have the IPS module participate in SensorBase data
sharing, click Full, Partial, or Off.