


4-5
Cisco ASA Series Firewall ASDM Configuration Guide
Chapter 4 Configuring Network Object NAT (ASA 8.3 and Later)
Configuring Network Object NAT
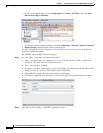
• Round robin, especially when combined with extended PAT, can consume a large amount of
memory. Because NAT pools are created for every mapped protocol/IP address/port range, round
robin results in a large number of concurrent NAT pools, which use memory. Extended PAT results
in an even larger number of concurrent NAT pools.
Detailed Steps
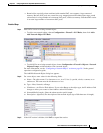
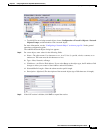
Step 1 Add NAT to a new or existing network object:
• To add a new network object, choose Configuration > Firewall > NAT Rules, then click Add >
Add Network Object NAT Rule.
• To add NAT to an existing network object, choose Configuration > Firewall > Objects > Network
Objects/Groups, and then double-click a network object.
For more information, see the “Configuring a Network Object” section on page 20-3 in the general
operations configuration guide.
The Add/Edit Network Object dialog box appears.
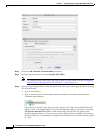
Step 2 For a new object, enter values for the following fields:
a. Name—The object name. Use characters a to z, A to Z, 0 to 9, a period, a dash, a comma, or an
underscore. The name must be 64 characters or less.
b. Type—Host, Network, or Range.
c. IP Address—An IPv4 or IPv6 address. If you select Range as the object type, the IP Address field
changes to allow you to enter a Start Address and an End address.
d. Netmask/Prefix Length—Enter the subnet mask or prefix length.
e. Description—(Optional) The description of the network object (up to 200 characters in length).
Step 3 If the NAT section is hidden, click NAT to expand the section.