1-11
Cisco ASA Series Firewall ASDM Configuration Guide
Chapter 1 Configuring a Service Policy
Adding a Service Policy Rule for Through Traffic
–
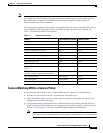
TCP or UDP Destination Port—The class matches a single port or a contiguous range of ports.
Tip For applications that use multiple, non-contiguous ports, use the Source and Destination IP
Address (uses ACL) to match each port.
–
RTP Range—The class map matches RTP traffic.
–
IP DiffServ CodePoints (DSCP)—The class matches up to eight DSCP values in the IP header.
–
IP Precedence—The class map matches up to four precedence values, represented by the TOS
byte in the IP header.
–
Any Traffic—Matches all traffic.
• Add rule to existing traffic class. If you already have a service policy rule on the same interface,
or you are adding to the global service policy, this option lets you add an ACE to an existing ACL.
You can add an ACE to any ACL that you previously created when you chose the Source and
Destination IP Address (uses ACL) option for a service policy rule on this interface. For this traffic
class, you can have only one set of rule actions even if you add multiple ACEs. You can add multiple
ACEs to the same traffic class by repeating this entire procedure. See the “Managing the Order of
Service Policy Rules” section on page 1-15 for information about changing the order of ACEs.
• Use an existing traffic class. If you created a traffic class used by a rule on a different interface,
you can reuse the traffic class definition for this rule. Note that if you alter the traffic class for one
rule, the change is inherited by all rules that use that traffic class. If your configuration includes any
class-map commands that you entered at the CLI, those traffic class names are also available
(although to view the definition of the traffic class, you need to create the rule).
• Use class default as the traffic class. This option uses the class-default class, which matches all
traffic. The class-default class is created automatically by the ASA and placed at the end of the
policy. If you do not apply any actions to it, it is still created by the ASA, but for internal purposes
only. You can apply actions to this class, if desired, which might be more convenient than creating
a new traffic class that matches all traffic. You can only create one rule for this service policy using
the class-default class, because each traffic class can only be associated with a single rule per service
policy.
Step 5 Click Next.
Step 6 The next dialog box depends on the traffic match criteria you chose.
Note The Any Traffic option does not have a special dialog box for additional configuration.
• Default Inspections—This dialog box is informational only, and shows the applications and the ports
that are included in the traffic class.
• Source and Destination Address—This dialog box lets you set the source and destination addresses:
a. Click Match or Do Not Match.
The Match option creates a rule where traffic matching the addresses have actions applied. The
Do Not Match option exempts the traffic from having the specified actions applied. For
example, you want to match all traffic in 10.1.1.0/24 and apply connection limits to it, except
for 10.1.1.25. In this case, create two rules, one for 10.1.1.0/24 using the Match option and one
for 10.1.1.25 using the Do Not Match option. Be sure to arrange the rules so that the Do Not
Match rule is above the Match rule, or else 10.1.1.25 will match the Match rule first.
b. In the Source field, enter the source IP address, or click the ... button to choose an IP address
that you already defined in ASDM.


