


Send documentation comments to mdsfeedback-doc@cisco.com
3-8
Cisco MDS 9200 Series Hardware Installation Guide
OL-17468-02
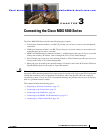
Chapter 3 Connecting the Cisco MDS 9200 Series
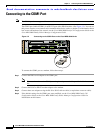
Connecting to a Fibre Channel Port
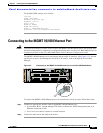
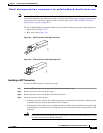
Installing an X2 Transceiver
To install an X2 transceiver, follow these steps:
Step 1 Attach an ESD-preventive wrist strap and follow its instructions for use.
Caution If the transceiver does not install easily, ensure that it is correctly oriented before continuing.
Step 2 Remove the dust cover from the port end of the transceiver.
Step 3 Insert the transceiver into the port. ensure the transceiver is fully seated.
Note If you cannot install the cable into the transceiver, insert or leave the dust plug in the cable end
of the transceiver.
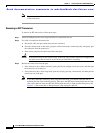
Removing an X2 Transceiver
To remove an X2 transceiver, follow these steps:
Step 1 Attach an ESD-preventive wrist strap and follow its instructions for use.
Step 2 If a cable is installed in the transceiver:
a. Record the cable and port connections for later reference.
b. Press the release latch on the cable, grasp the connector near the connection point, and gently pull
the connector from the transceiver.
c. Insert a dust plug into the cable end of the transceiver.
Caution If the transceiver does not remove easily in the next step, push the transceiver completely in
and then ensure that the latch is in the correct position before continuing.
Step 3 Remove the transceiver from the port.
Step 4 Insert a dust cover into the port end of the transceiver and place the transceiver on an antistatic mat or
into a static shielding bag if you plan to return it to the factory.
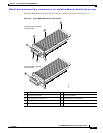
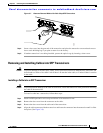
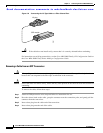
Removing and Installing SFP Transceivers
Caution Excessively removing and installing an SFP transceiver can shorten its life. Do not remove and insert
SFP transceivers more often unless it is absolutely necessary. Cisco recommends disconnecting cables
before installing or removing SFP transceivers to prevent damage to the cable or transceiver.