


Installing System Components 125
1
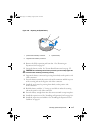
Turn off the system, including any attached peripherals, and disconnect
the system from the electrical outlet and peripherals.
2
Open the system. See "Opening the System" on page 79.
3
Remove the expansion card stabilizer. See "Removing the Expansion Card
Stabilizer" on page 81.
4
Remove the cooling shroud. See "Removing the Cooling Shroud" on
page 82.
5
Disconnect all the cables from the system board.
6
If applicable, remove all expansion cards and any attached cables.
See "Removing an Expansion Card" on page 107.
7
If applicable, remove the iDRAC6 Express card. See "Removing an
iDRAC6 Express Card (Optional)" on page 109.
8
If required, disconnect the cables from the SATA backplane.
9
Remove all the memory modules and memory blanks. See "Removing
Memory Modules" on page 102.
NOTE: To ensure proper reinstallation of memory modules, record the
memory module socket locations.
10
Remove the system fan. See "Removing the System Fan" on page 96.
WARNING: The heat sink can get hot during operation. To avoid burns, ensure
that the system has sufficient time to cool before removing the system board.
11
Remove the heat sink and processor. See "Removing a Processor" on
page 112.
12
Carefully route any loose cables away from the edges of the system board.
13
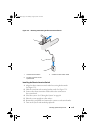
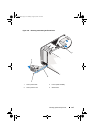
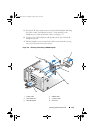
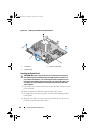
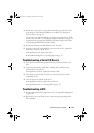
To remove the system board, using a Phillips screwdriver, remove all the
screws on the board. See Figure 3-24.
14
While holding the two touch points on the system board, slide the system
board toward the front of the system. See Figure 3-24.
15
Lift the system board away from the chassis.
book.book Page 125 Monday, August 9, 2010 3:07 PM