


Installing System Components 87
Installing a Hot-Swap Hard Drive
CAUTION: Use only hard drives that have been tested and approved for use with
the SATA backplane.
CAUTION: When installing a hard drive, ensure that the adjacent drives are fully
installed. Inserting a hard-drive carrier and attempting to lock its handle next to a
partially installed carrier can damage the partially installed carrier's shield spring
and make it unusable.
CAUTION: Ensure that your operating system supports hot-swap drive
installation. See the documentation supplied with your operating system.
CAUTION: Combining SATA and SAS hard drives in the same system
configuration is not supported.
1
Remove the front bezel
. See
"Removing the Front Bezel" on page 75.
2
If a drive blank is present in the bay, remove it. See "Removing a Hard-
Drive Blank" on page 84.
3
Install the hot-swap hard drive into the hard-drive carrier. See "Installing a
Hot-Swap Hard Drive Into a Drive Carrier" on page 89.
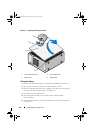
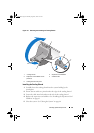
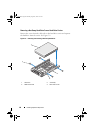
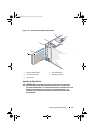
4
With the handle on the hard-drive carrier open, slide the hard drive into
the drive bay until the carrier contacts the backplane.
5
Push in on the hard-drive carrier and rotate the handle up until it
snaps into place.
6
Replace the front bezel. See "Installing the Front Bezel" on page 76.
book.book Page 87 Monday, August 9, 2010 3:07 PM