


288 Using the Control Panel
1. Make sure the LCD panel displays Ready or Sleep, then press
the Enter button to access the control panel menus.
2. Press the d Down button repeatedly until Mode Config. Menu
appears on the LCD panel, then press the Enter button.
3. Press the d Down button repeatedly until Change Mode Color
is displayed, then press the Enter button.
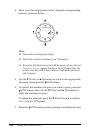
4. When the LCD panel displays Change Toner to xx, remove
the currently installed black toner cartridge and insert a toner
cartridge of the color indicated as xx (C, M, or Y). See
"Replacing a toner cartridge" on page 316 for instructions on
how to replace a toner cartridge.
Note:
If the wrong toner cartridge was installed, the printer does not go
to the next step. Follow the instructions that appear on the LCD
panel.
5. After three of the black toner cartridges are replaced by the
color toner cartridges, the printer automatically changes to
the Color mode.
Note for Windows users:
If EPSON Status Monitor 3 is not installed, select the Color Toner
Cartridges check box on the Optional Settings dialog box. The
Optional Settings dialog box appears by clicking the Settings
button on the Optional Settings tab.
Note for Mac OS X users:
After changing the modes, you need to close all applications, delete
the printer using Print Setup Utility (for Mac OS X 10.3) or Print
Center (for Mac OS X 10.2 or below), and then re-register the
printer.