


Servicing Customer-Replaceable Units 109
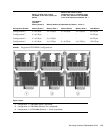
a. Press the FB-DIMM fault button.
See “FB-DIMM Fault Button Locations” on page 117.
b. Note which FB-DIMM fault LED is illuminated.
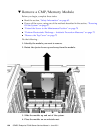
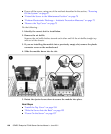
2. Push down on the ejector tabs on each side of the FB-DIMM until the
FB-DIMM is released.
Caution – FB-DIMMs might be hot. Use caution when servicing FB-DIMMs.
3. Grasp the top corners of the faulty FB-DIMM and remove it from the
CMP/memory module.
4. Place the FB-DIMM on an antistatic mat.
5. Repeat Step 2 through Step 4 to remove any additional FB-DIMMs.
▼ Install FB-DIMMs
1. Unpackage the replacement FB-DIMMs and place them on an antistatic mat.
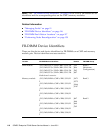
Tip – See “FB-DIMM Configuration” on page 113 for information about configuring
the FB-DIMMs.
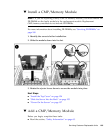
2. Ensure that the ejector tabs are in the open position.
3. Line up the replacement FB-DIMM with the connector.
Align the FB-DIMM notch with the key in the connector. This ensures that the
FB-DIMM is oriented correctly.
4. Push the FB-DIMM into the connector until the ejector tabs lock the FB-DIMM
in place.
If the FB-DIMM does not easily seat into the connector, verify that the orientation
of the FB-DIMM is correct. If the orientation is reversed, damage to the FB-DIMM
might occur.
5. Repeat Step 2 through Step 4 until all replacement FB-DIMMs are installed.
Next Steps
■ “Install a CMP/Memory Module” on page 105
■ “Install the Top Cover” on page 154
■ “Slide the Server Into the Rack” on page 155