


Servicing Customer-Replaceable Units 113
▼ Add FB-DIMMs
If you are upgrading the system with additional FB-DIMMs, use this procedure.
Before you begin, complete these tasks:
■ Read the section, “Safety Information” on page 63.
■ Read the sections, “FB-DIMM Configuration” on page 113 and “FB-DIMM Device
Identifiers” on page 116.
■ Power off the server using one of the methods described in the section, “Powering
Off the System” on page 67.
■ “Extend the Server to the Maintenance Position” on page 70
■ “Perform Electrostatic Discharge – Antistatic Prevention Measures” on page 73
■ “Remove the Top Cover” on page 73
■ “Remove a CMP/Memory Module” on page 104
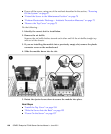
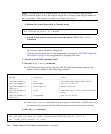
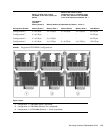
1. Unpackage the FB-DIMMs and place them on an antistatic mat.
2. Ensure that the ejector tabs are in the open position.
3. Line up the FB-DIMM with the connector.
Align the FB-DIMM notch with the key in the connector. This ensures that the
FB-DIMM is oriented correctly.
4. Push the FB-DIMM into the connector until the ejector tabs lock the FB-DIMM
in place.
If the FB-DIMM does not easily seat into the connector, verify that the orientation
of the FB-DIMM is correct. If the orientation is reversed, damage to the FB-DIMM
might occur.
5. Repeat Step 2 through Step 4 until all the FB-DIMMs are installed.
Next Steps
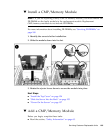
■ “Install a CMP/Memory Module” on page 105
■ “Install the Top Cover” on page 154
■ “Slide the Server Into the Rack” on page 155
■ “Power On the Server” on page 157
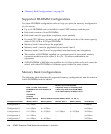
FB-DIMM Configuration
This topic includes the following:
■ “Supported FB-DIMM Configurations” on page 114