


Hardware
Installing the LCS60
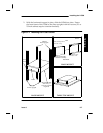
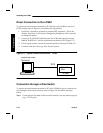
Wall Mounting
Wall mounting the LCS60 requires a Wall Mount Assembly to position the unit
vertically as shown in Figure 2-1.
Wall mounting requires a surface 45 inches wide by 21 inches high covered by a
securely-fastened ¾-inch plywood sheet (or a comparably stable mounting sur-
face).
The handles for the LCS60 are shipped in a separate package within the main
shipping box. If desired, attach the handles to the front frame, with the handles
pointing away from the LCS60, using the four flat-head machine screws.
To wall mount the unit:
1 . Using the Wall Mounting Assembly as a template, mark the location of
the four mounting holes on the plywood sheet. Drill the pilot holes or
install appropriate anchors, as required.
Note: To function properly, the LCS60 must be positioned in the Wall Mount
Assembly with the disk and tape drive on top, the bottom surface
toward the wall, and the front cover of the LCS60 to the left.
2 . Attach the Wall Mounting Assembly to the plywood surface, using four ¼
x ¾-inch lag screws.
3 . Locate the LCS60 in the mounting assembly by aligning the front flange of
the LCS60 with the four threaded holes on the flange at the left end (facing
the assembly). Secure the LCS60 to the assembly, using the four M6 x
12mm screws included with the Wall Mount Assembly.
Table-Top Mounting
The handles for the LCS60 are shipped in a separate package within the main
shipping box. Attach the handles to the front frame, with the handles pointing
away from the LCS60, using the four flat-head machine screws.
Install the LCS60 on a stable surface with the required clearance as described pre-
viously under Space Requirements.
2-8 Issue 3