7.4. Changing Device and Drive State
The administrative state of a device or drive can be set to Unlocked or Locked. This controls whether
HPSS can access the drive. Changing the state of a device or drive can be accomplished via the Devices
and Drives list window.
Notice that there are two sets of Lock, Unlock and Mark Repaired button groups on the Devices and
Drives window. The first group is titled Device Administration and the second group is titled Drive
Administration. The first group is working at the Mover device level and the second group is working at
the PVL drive level.
Locking devices serves no functional purpose. When the device is locked, the information is not
transferred to the PVL and thus the PVL will continue to schedule the associated PVL drive. It is also not
transferred to the Core Server (CS) where the CS will continue to read and write the Volume (see VV
Condition in the Core Server Volume Disk/Tape window) that is mounted in the drive.
When a drive is locked, the PVL will no longer schedule the PVL drive. When locking a tape drive due
to a cartridge problem (e.g. stuck tape), it is beneficial to also cancel the PVL Job associated with the
cartridge. Additionally, locking the drive is not transferred to the Core Server (CS), therefore the CS will
continue to read and write the Volume (see VV Condition in the Core Server Volume Disk/Tape
window) unless you change the VV Condition to DOWN (or EOM) which is advised while diagnosing
the stuck tape.
7.4.1. Unlocking a Drive
The Administrative State of the drive must be unlocked to allow HPSS to make use of a device/drive.
Before unlocking a drive, ensure that its hardware is functional and is fully configured into its host’s
operating system and into HPSS. Configuration of an HPSS drive is described in Section 7.1: Configure
a New Device & Drive on page 196.
From the Devices and Drives window (Section 7.1.1 Devices and Drives Window on page 202), select the
desired device/drive entries and then click on the Unlock button from the Drive button group. The drive
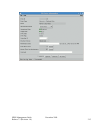
can also be unlocked by bringing up the PVL Drive Information window and set its Administrative State
to Unlocked.
7.4.2. Locking a Drive
To lock a drive, go to the Devices and Drives window (Section 7.1.1 Devices and Drives Window on
page 202), select the desired device/drive entries and then click on the Lock button from the Drive button
group. The drive can also be locked by bringing up the PVL Drive Information window and set its
Administrative State to Locked.
Locking a drive disallows its use by HPSS. Changing a drive state to locked will ensure that the drive
will not be used for new mounts.
Always lock the PVL drive instead of the Mover device. Mover devices do not usually need to be locked
or unlocked, and the capability to lock and unlock them is provided for troubleshooting purposes only.
Locking a tape drive will not affect an active job which has a volume mounted. Once that job has
completed, the drive will be dismounted and no further mounts will take place. This may be useful when
preventative maintenance is required for an operating drive.
HPSS Management Guide November 2009
Release 7.3 (Revision 1.0) 220


