


Related
Documentation
Mounting an EX2200 Switch on Two Posts in a Rack or Cabinet on page 55•
• Mounting an EX2200 Switch on Four Posts in a Rack or Cabinet on page 57
• Mounting an EX2200 Switch in a Recessed Position in a Rack or Cabinet on page 61
• Mounting an EX2200 Switch on a Desk or Other Level Surface on page 54
• Mounting an EX2200 Switch on a Wall on page 61
• Connecting Earth Ground to an EX Series Switch on page 67
Mounting an EX2200 Switch on a Desk or Other Level Surface
YoucanmountanEX2200switchonadeskorotherlevelsurfacebyusingthefourrubber
feet that are shipped with the switch. The rubber feet stabilize the chassis.
Before mounting the switch on a desk or other level surface:
•
Verify that the site meets the requirements described in “Site Preparation Checklist
for EX2200 Switches” on page 33.
•
Place the desk in its permanent location, allowing adequate clearance for airflow and
maintenance, and secure it to the building structure.
•
Read “General Safety Guidelines and Warnings for EX Series Switches” on page 113,
withparticularattentionto“ChassisLiftingGuidelinesforEX2200Switches”onpage128.
•
Remove the switch from the shipping carton (see “Unpacking an EX2200 Switch” on
page 52).
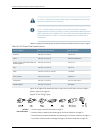
Ensure that you have the following parts and tools available:
•
4 rubber feet to stabilize the chassis on the a desk or other level surface (provided in
the accessory compartment in the switch carton)
To mount a switch on a desk or other level surface:
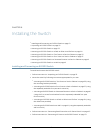
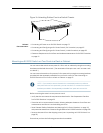
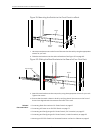
1. Turnthe chassis upside down on the desk or the level surface where you intend to
mount the switch.
2. Attach the rubber feet to the bottomof the chassis, as shownin Figure 14 on page 55.
3. Turn the chassis right side up on the desk or the level surface.
Copyright ©2010,Juniper Networks,Inc.54
CompleteHardwareGuide forEX2200 EthernetSwitches