


CHAPTER 9
Installing Switch Components
•
Installing a Transceiver in an EX Series Switch on page 65
Installing a Transceiver in an EX Series Switch
The transceivers for EX Series switches are hot-removable and hot-insertable
field-replaceable units (FRUs): Youcan remove and replace them without powering off
the switch or disrupting switch functions.
Use only optical transceivers and optical connectors purchased from Juniper Networks
for your EX Series switch.
NOTE: Onan EX3200 switch, if youinstall a transceiver in a 1-gigabit uplink
moduleport, a corresponding network port from the last four built-inports
is disabled. For example, if you install a transceiver in the 1-gigabit uplink
moduleport 2 (ge-0/1/3), then built-in port 23 (ge-0/0/23) is disabled. The
disabled port is not listed in the output of show interface commands.
Before you begin installing a transceiver in an EX Series switch, ensure that you have
taken the necessary precautions for safe handling of lasers (see “Laser and LED Safety
Guidelines and Warnings for EX Series Switches” on page 121).
Ensure that you have a rubber safety cap available to cover the transceiver.
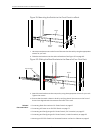
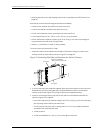
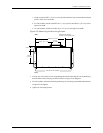
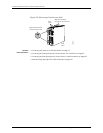
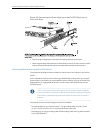
Figure24onpage66 shows howtoinstallan SFP transceiver.The procedureis thesame
for all transceiver types.
To install a transceiver in an EX Series switch:
CAUTION: Toavoidelectrostaticdischarge(ESD)damagetothetransceiver,
do not touch the connectorpins at the end of the transceiver.
1. Remove the transceiver from its bag.
2. Check to see whether the transceiver is covered by a rubber safety cap. If it is not,
cover the transceiver with a rubber safety cap.
65Copyright©2010,Juniper Networks,Inc.