


•
Phillips (+) screwdriver, number 2
•
2 mountingbrackets and 8mounting screws(provided in the accessorycompartment
in the switch carton)
•
Screws to secure the chassis to the rack (not provided)
•
2-in.-recessfrontbracketsifyouwill mountthe switchina recessedposition(brackets
from the separately orderable four-post rack-mount kit)
NOTE: Onepersonmustbe available toliftthe switchwhileanothersecures
the switch to the rack.
CAUTION: If you are mounting multiple units on a rack, mount the heaviest
unit at the bottom of the rack and mount the other units fromthe bottom of
the rack to the top in decreasing order of the weight of the units.
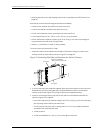
To mount the switch on two posts in a rack:
1. Place the switch on a flat, stable surface.
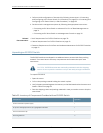
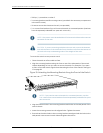
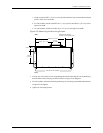
2. Align the mounting brackets along the front or rear of the side panels of the switch
chassis depending on how you want to mount the switch. For example, if you want
tofront-mounttheswitch,alignthebracketsalongthefrontofthechassis.SeeFigure
15 on page 56.
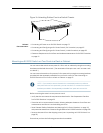
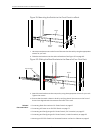
Figure 15: Attaching the Mounting Bracket Along the Front of the Switch
g027019
SYS
ALM
SPD
DX
EN
POE
NOTE: Ifyou need to mount the switch in a recessed position, use the
2-in.-recessfrontmountbracketsfromtheseparatelyorderablefour-post
rack-mountkit.
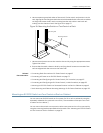
3. Align the bottom holes in the mounting brackets with holes on the side panels of the
switch chassis.
4. Insert the mounting screws into the aligned holes. Tighten the screws.
5. Ensure thatthe other holes in the mounting bracketsare aligned with the holes in the
side panels. Insert a screw in each hole and tighten the screws.
Copyright ©2010,Juniper Networks,Inc.56
CompleteHardwareGuide forEX2200 EthernetSwitches