


February 2003 3-11
1000-A2-GN22-00 3. Installing the CPX-1000
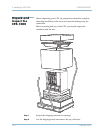
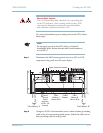
Step 3 Remove the inside top shock absorber, then lift off the box sides.
Step 4 Open the plastic bag covering the equipment, and push it down
into the bottom box lid.
Step 5 Inspect the CPX for damage.
Step 6 If damaged, return the equipment to Paradyne (Warranty, Sales,
Service, and Training Information at the beginning of this
document).
Step 7 With the help of another person, carefully lift the CPX enclosure
from the box and place it on a firm, stable surface.
Inventory CPX
Components
Before beginning installation, inventory the components against
your packing list or order. If any components are missing, notify
the Technical Support Center (TSC).
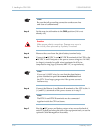
Typical contents will include:
—1 CPX Chassis
—1 MP Card
—2 CP Cards
—2 HSC Cards
— STS Splitter Assembly (for STS equipped CPX)
—MP to CP cables
—CP to CP cables
— Mounting flanges, screws and other hardware
— T1 or STS cards (to order)
Check all packages received for these components. Usually, the
cards are pre-installed in the unit; some cards may be packed
separately.
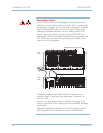
Caution
The CPX weighs 90 lbs. when the module cage is fully
loaded. Shipping weight, including the packaging material
and the pallet, is 126 lbs.
Use safe lifting techniques—have another person help you to
remove the shelf from the box bottom and pallet.