


Troubleshooting_ 102
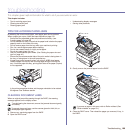
5. Close the white document background and the scanner lid. Then load
the removed pages back into the DADF.
CLEARING PAPER JAMS
When a paper jam occurs, the warming message appears on the display
screen. Refer to the table below to locate and clear the paper jam.
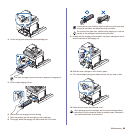
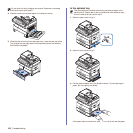
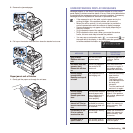
In the tray 1
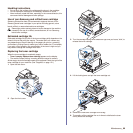
1. Pull out the paper tray to open. After you pull it out completely, lift the
front part of the tray up slightly to release the tray from the machine.
2. Remove the jammed paper by gently pulling it straight out.
Once you remove the jammed paper here, open the side cover and then
close it to clear the error message on the display.
If there is any resistance, and the paper does not move immediately when
you pull, stop pulling. Then:
3. Open the side cover.
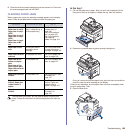
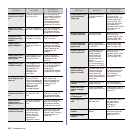
MESSAGE LOCATION OF JAM GO TO
Paper Jam in tray 1,
Paper Jam in tray 2,
Paper Jam in tray 2
(HCF),
Paper Jam in tray 3,
Paper Jam in tray 3
(HCF),
Paper Jam in tray 4,
Paper Jam in MP
tray
In the paper feed area
(tray 1, optional tray, or
multi-purpose tray)
See "In the multi-
purpose tray" on
page 106.
See "In the optional
tray" on page 103.
See "In the optional
high capacity
feeder" on page 104.
Paper Jam in exit
area
In the fuser area or
around the toner
cartridge
See "In the fuser area
or around the toner
cartridge" on page 106.
Paper Jam inside of
machine
In the paper exit area See "In the paper exit
area" on page 106.
Paper Jam at the
bottom of duplex
path,
Paper Jam at the
top of duplex path,
Paper Jam inside of
duplex path
In the duplex unit See "In the duplex unit
area" on page 107.
Paper jam in front of
finisher
In the stacker unit See "Paper jam in front
of finisher" on
page 107.
Paper jam inside
finisher, Paper jam
inside finisher’s
duplex
In the stacker unit See "Paper jam inside
finisher, Paper jam
inside finisher’s
duplex" on page 107.
Paper jam at exit of
finisher
In the stacker unit See "Paper jam at exit
of finisher" on
page 108.
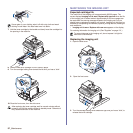
To avoid tearing the paper, pull the jammed paper out gently and
slowly. Follow the instructions in the following sections to clear the
jam.