


31 _Getting Started
• IP Address: Enter a new IP address for your machine.
• Subnet Mask: Enter a new Subnet Mask for your machine.
• Default Gateway: Enter ta new Gateway for your machine.
6. Click Apply, and then click OK. The machine will automatically print the
Network Configuration Report. Confirm that all the settings are
correct.
7. Click Exit to close the SetIP program.
8. If necessary, restart the computer’s firewall.
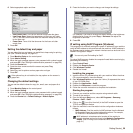
Printing out the machine’s MAC address
1. Press Machine Setup on the control panel.
2. Press Machine Status > the Machine Info tab > Print/Report.
3. Press
System Report
.
4. Scroll down the list on the right and select Network Configuration
Report.
5. Press Print.
IP setting using SetIP Program (Macintosh)
For using SetIP program, disable the computer firewall before continuing by
performing the following:
1. Open System Preferences.
2. Click Security.
3. Click the Firewall menu.
4. Turn firewall off.
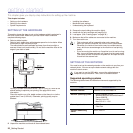
Starting the program
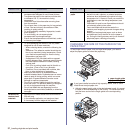
1. Connect your machine and the computer using network cable.
2. Insert the driver CD-ROM, and open the disk window. Open the
MAC_Installer > MAC_Printer > SetIP > SetIPapplet.html.
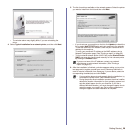
3. Double click the file and Safari will automatically open, then select
Trust. The browser will open the SetIPapplet.html page that shows the
printer’s name and IP address information.
4. Highlight the printer information row and select the Setup icon, which is
the second icon from the left in the application menu bar. A TCP/IP
Configuration window will open.
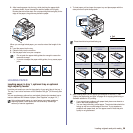
5. Enter the printer’s new information into the configuration window as
follows. In a corporate intranet, you may need to have this information
assigned by a network manager before proceeding.
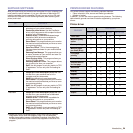
• MAC Address: Find the machine’s MAC address from the Network
Configuration Report and enter it without the colons. For example,
00:15:99:29:51:A8 becomes 0015992951A8.
• IP Address: Enter a new IP address for your machine.
• Subnet Mask: Enter a new Subnet Mask for your machine.
• Default Gateway: Enter ta new Gateway for your machine.
6. Select Apply, then OK, and OK again. The printer will automatically
print the configuration report. Confirm that all the settings are correct.
Quit Safari. You may close and eject the installation CD-ROM. If
necessary, restart the computer’s firewall. You have successfully
changed the IP address, subnet mask, and gateway.
IP setting using SetIP Program (Linux)
SetIP program should be automatically installed during the printer driver
installation.
1. Print the machine’s network configuration report to find your machine’s
MAC address. (See "Printing out the machine’s MAC address" on
page 31.)
2. Open the /opt/Samsung/mfp/share/utils/.
3. Double click the SetIPApplet.html file.
4. Click to open the TCP/IP configuration window.
5. Enter the network card’s MAC address, IP address, subnet mask,
default gateway, and then click Apply.
6. The machine prints the network information. Confirm all the settings are
correct.
7. Close the SetIP program.
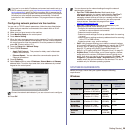
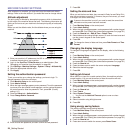
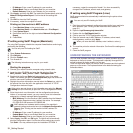
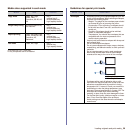
UNDERSTANDING THE KEYBOARD
You can enter alphabet characters, numbers, or special symbols using the
keyboard on the touch screen. This keyboard is specially arranged like a
normal keyboard for better usability for the user.
Touch the input area where you need to enter characters and the keyboard
pops up on the screen. The keyboard below is the default showing the
lowercase letters.
You can only use IPv4 setting for SetIP.
The following instructions may vary for your model.
If the printer was not shown in the information row, select the Manual
Setting icon (third from left) to open the TCP/IP Configuration window.
MAC address is a hardware serial number of the machine’s
network interface and can be found in the Network Configuration
Report. (See "Printing out the machine’s MAC address" on
page 31.)
You can only use IPv4 setting for SetIP.
When you enter the MAC address, enter it without a colon(:).
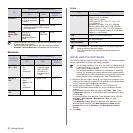
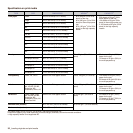
1
Left/Right
Moves the cursor between characters in the input
area.
2
Backspace
Deletes the character on the left side of the
cursor.
3
Delete
Deletes the character on the right side of the
cursor.
4
Clear
Deletes all characters in the input area.
5
Input area
Enters letters within this line.
6
Shift
Toggles between lowercase keys and uppercase
keys or vice versa.
7
Symbols
Switches from the alphanumeric keyboard to the
symbol keyboard.
8
Space
Enters a blank between characters.