


Machine status and advanced setup_90
User Authentication Method
If you are an administrator, you can enable authentication service before
using the machine to improve security for the device. If user
authentication service has been activated, only authorized users can
use the device. With authentication service, you also can give
permission to each user and set the maximum number of job executions
for a user.
The authentication service and accounting service can be enabled
independently. The services refer to the user information differently case
by case.
• Using Local Authentication only,
Using Local Authentication and Standard Accounting,
Using Local Authentication and Network Accounting: Refers to
User Profile from Security > User Access Control menu.
• Using Network Authentication only,
Using Network Authentication and Standard Accounting,
Using Network Authentication and Network Accounting: Refers
to the user information in the network authentication server. Disable
the user in User Profile to access the device.
• Standard Accounting only: Refers to the Standard Account List
from SyncThru™ Web Service > Security > User Access Control
> Accounting. (See "Managing your machine from the website" on
page 99.)
• Network Accounting only: Refers to the user information in network
authentication server.
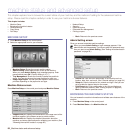
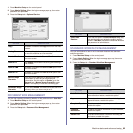
Registering local authorized users
1. Enter your machine’s IP address as the URL in a browser and click
Go to access the SyncThru™ Web Service for your machine.
2. Log in to the SyncThru™ Web Service as an administrator. (See
"Managing your machine from the website" on page 99.)
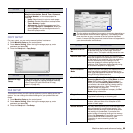
3. Select Security > User Access Control > Authentication >
Authentication Method.
4. Select Local Authentication.
5. Click on the Apply button.
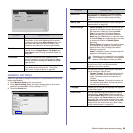
6. Click on Authority, and check a Role Name according to the current
user’s role.
• You can create a new role group by clicking on the Add button.
7. Click on User Profile and check the users.
• You can add users by clicking the Add button.
• If you want add information to the Address Book, check the
Automatically add your information to Address Book.
• Select the user’s accounting ID if the accounting service is activated.
• Select the user’s role from Role item.
8. Click on Apply.
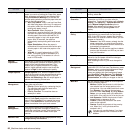
Register authorized network users
1. Enter your machine’s IP address as the URL in a browser and click
on Go to access the SyncThru™ Web Service of your machine.
2. Log in to the SyncThru™ Web Service as an administrator. (See
"Managing your machine from the website" on page 99.)
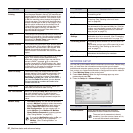
3. Select Security > User Access Control > Authentication >
Authentication Method.
4. Select Kerberos, SMB, or LDAP.
5. Click on the Apply button.
6. Click on Authority, and check the Role Name according to the
current user’s role.
• Users can create a new role group by clicking on the Add button.
7. Click on User Profile and check the users.
• You can create a new role group by clicking on the Add button.
• If you want add the information to Address Book, check the
Automatically add your information to Address Book option.
• Select the user’s accounting ID if the accounting service is activated.
• Select the user’s role from Role.
8. Click Apply.
Enabling network authentication by Kerberos
1. Log in to the SyncThru™ Web Service as an administrator. (See
"Managing your machine from the website" on page 99.)
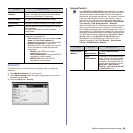
2. Select Security > Network Security > External Authentication
Server > Kerberos Server.
• Click on the Add button if you want to add more servers.
3. Enter the realm used for Kerberos login.
4. Select the IP Address or Host Name.
5. Enter the IP address in dotted decimal notation or as a host name.
6. Enter the server port number, from 1 to 65535.
The default port number is 88.
7. You can add a backup domain as a previous step.
8. Click on Apply.
Enabling network authentication by SMB
1. Log in to the SyncThru™ Web Service as an administrator. (See
"Managing your machine from the website" on page 99.)
2. Select Security > External Authentication Server > SMB Server.
• Click on the Add button if you want to add more servers.
3. Enter the domain that is used for SMB login.
4. Select IP Address or Host Name.
5. Enter the IP address in dotted decimal notation or as a host name.
6. Enter the server port number, from 1 to 65535.
The default port number is 139.
7. Users can add a backup domain as in the previous step.
8. Click on Apply.
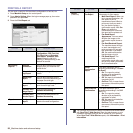
Enabling network authentication by LDAP
1. Log in to the SyncThru™ Web Service as an administrator. (See
"Managing your machine from the website" on page 99.)
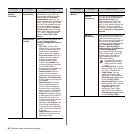
2. Select Security > Network Security > External Authentication
Server > LDAP Server.
• Click on the Add button if you want to add more servers.
3. Enter your machine’s IP address as the URL in a browser and click
Go to access the SyncThru™ Web Service of your machine.
4. Log in to the SyncThru™ Web Service as an administrator. (See
"Managing your machine from the website" on page 99.)
5. Click Security > Network Security > External Authentication
Server > LDAP Server.
6. Select IP Address or Host Name.
7. Enter the IP address in dotted decimal notation or as a host name.
8. Enter the server port number, from 1 to 65535.
The default port number is 389.
9. Enter Search Root Directory, the top search level of the LDAP
directory tree.
10. Select Authentication method. There are two options for LDAP
server login:
Anonymous: This is used to bind with null password and login ID
Before configuring network authentication, you need to configure
External Authentication Server from Security > Network
Security
Users can add up to 6 alternate domains.