


4 Replacement Procedures 4.17 Wireless LAN Antenna/Display Cover/Speaker
Installing the Wireless LAN Antenna/Display Cover/Speaker
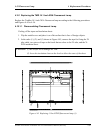
The following describes the procedure for installing the wireless LAN antenna, display cover,
and display cable (See Figure 4-37 to 4-44).
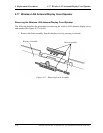
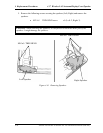
1. Install the hinges to the display assembly and secure them with the following screws.
• M2.5x6 PSP TIGHT screw x3 (Left: 2, Right:1)
• M2.5x5 THIN BIND screw x1 (Right)
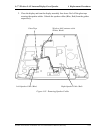
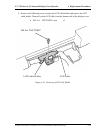
2. Install the left and right speaker nets and bend the edges (at four points each) using a
device such as a flatblade driver and secure them.
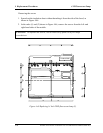
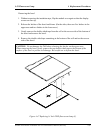
3. Install the display cover to the display assembly.
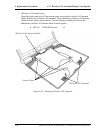
4. Open the display at 45-degree slant and secure the hinges to the display cover with
the following screws.
• M2.5x2.8 THIN BIND screw x2
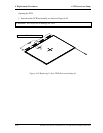
5. Secure the hinges to the display cover with the following screws. Stick two mask
seals on each side of the display cover.
• M2.5x2.8 THIN BIND screw x4 (Display cover side)
• M2.5x6 THIN BIND screw x2 (FL inverter side)
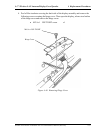
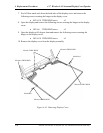
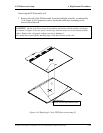
6. (For wireless LAN models only)
Fit the wireless LAN antennas to the grooves at the rear of the display cover with
double-sided adhesive tapes. Set the wireless LAN antenna cables and stick four
acetate tapes on the cables.
7. (For wireless LAN models only)
Pass the wireless LAN antenna cables through the bottom of the display cover toward
the back side of the display assembly.
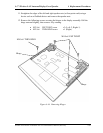
8. Pass the LCD cable from the bottom of the display cover toward the back side of the
display assembly. Then install the LCD cable holder and secure the holder with the
following screw.
• M2.5x4 PSP TIGHT screw x1
9. Turn the display assembly face down. Close the display and attach the hinge cover.
Then open the display and secure two latches of the hinge cover. Turn the display
assembly face down and secure the hinge cover with the following screw.
• M2.5x4 PSP TIGHT screw x1
4-62 Satellite A10/TECRA A1/Satellite Pro A10 Maintenance Manual (960-445)