


Ch02_ScanOverview.fm Modified: 8/7/02
Template Version 1.0
20 GL-1020 Scan Operator’s Guide
SCANNING A DOCUMENT
In outline, the procedure for scanning a document is:
1 Decide where you want to send the image file, since this
governs your choice of scan template.
2 Place the document in the copier’s Automatic Document
Feeder (ADF) or place the first page on the glass.
3 Press PRINTER/NETWORK on the control panel.
4 Press SCAN on the LCD touch screen and choose the type of
scan job.
5 For a public scan job, select the template. For a private scan
job, select the private template group and then the template.
6 View the scan settings and make any changes.
7 Press START on the control panel or SCAN! to begin scanning
your document.
For more detail, see the Scanning Documents chapter.
Once you have scanned a document, it joins the queue of current
scan jobs waiting to be sent to their specified destinations.
Cancelling a Scan Job
Suppose you return to your desk to find an updated version of the
document you just scanned. If the scanned image is still in the
current jobs queue, you can delete it using TopAccess.
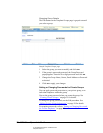
1 In TopAccess, select the Scan tab to open the Current Jobs
page.
2 Scroll down the list to find your job.
3 Select the job and click Delete.
For more detail, see the chapter on Managing Scan Jobs.
SENDING A FAX
You can use the GL-Scan feature to send an iFax. The first time
you do this, you need to create a template that contains your name
and return email address.
If you regularly send faxes to one or more groups of people, you
can create a template for each set of recipients. You can add the
subject and covering message for the fax at the control panel.