


06_ContScanProcedure.fm Modified: 8/7/02
Template Version 1.0
46 GL-1020 Scan Operator’s Guide
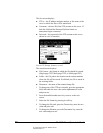
n 150
7Press
AUTO to automatically set the exposure. Or press the
right or left arrows to manually lighten or darken the
exposure.
8Press
NEXT to move to the next page.
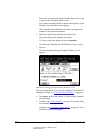
9 Set the original paper size. Select:
n AUTO detects the size of the first page of the original only
n MIXED ORIGINAL SIZES detects the size of every page of the
original. The combinations of mixed original sizes are
limited and depend on your region.
Region = UC : LD and LT, LG and LT-R
Region = EUR : A3 and A4
n A3, A4, LD, LT, A4-R, A5-R, LT-R, LG, B4, B5, ST-R,
COMP, B5-R, FOLIO, 13"LG, 8.5"SQ
These values specify the page size.
10 Press
OK to save your new settings and return to the Scan
Settings & Agent Settings Summary screen, or press
CANCEL to leave the settings unchanged.
SCAN AGENT SETTINGS IN THE CONTROL PANEL
Each template that has been set up using the TopAccess web
utility has a scan agent assigned to it. The scan agent transfers the
image file to its destination. There are six scan agents: Send to
TWAIN, Send to File, Send to Email, Send to iFax, Send to
TopAccessComposer, and Send to FTP. The administrator defines
the scan agents. You select the scan agent when you create a
template.
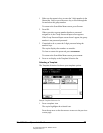
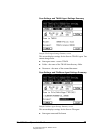
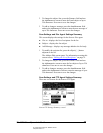
Scan and Agent Settings Summary Screens
The scan settings area of each screen displays icons of the
currently selected options for scan type, rotation, document type,
resolution, exposure, ADF or glass, and paper size.
To change any of these settings, press
SETTING to go to the Scan
Parameter Setting screens. For details, see “
Scan Parameter
Settings” on page 45.