


3-9
# Set the maximum number of lines the screen can contain to 30.
[Sysname-ui-vty0] screen-length 30
# Set the maximum number of commands the history command buffer can store to 20.
[Sysname-ui-vty0] history-command max-size 20
# Set the timeout time to 6 minutes.
[Sysname-ui-vty0] idle-timeout 6
Telnetting to a Switch
Telnetting to a Switch from a Terminal
1) Assign an IP address to VLAN-interface 1 of the switch (VLAN 1 is the default VLAN of the switch).
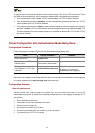
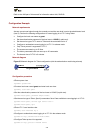
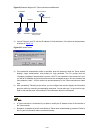
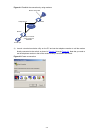
z Connect the serial port of your PC/terminal to the console port of the switch, as shown in Figure 3-4
Figure 3-4 Diagram for establishing connection to a console port
z Launch a terminal emulation utility (such as Terminal in Windows 3.X or HyperTerminal in
Windows 95/Windows 98/Windows NT/Windows 2000/Windows XP) on the PC terminal, with the
baud rate set to 19,200 bps, data bits set to 8, parity check set to none, and flow control set to none.
z Turn on the switch and press Enter as prompted. The prompt appears.
z Perform the following operations in the terminal window to assign IP address 202.38.160.92/24 to
VLAN-interface 1 of the switch.
<Sysname> system-view
[Sysname] interface Vlan-interface 1
[Sysname-Vlan-interface1] ip address 202.38.160.92 255.255.255.0
2) Perform Telnet-related configuration on the switch. Refer to Telnet Configuration with
Authentication Mode Being None
, Telnet Configuration with Authentication Mode Being Password,
and
Telnet Configuration with Authentication Mode Being Scheme for more.
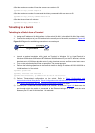
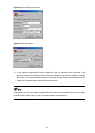
3) Connect your PC/terminal and the Switch to an Ethernet, as shown in
Figure 3-5. Make sure the
port through which the switch is connected to the Ethernet belongs to VLAN 1 and the route
between your PC and VLAN-interface 1 is reachable.