


1-31
[Switch] user-interface vty 0 4
[Switch-ui-vty0-4] authentication-mode scheme
# Enable the user interfaces to support SSH.
[Switch-ui-vty0-4] protocol inbound ssh
[Switch-ui-vty0-4] quit
# Configure the HWTACACS scheme.
[Switch] hwtacacs scheme hwtac
[Switch-hwtacacs-hwtac] primary authentication 10.1.1.1 49
[Switch-hwtacacs-hwtac] primary authorization 10.1.1.1 49
[Switch-hwtacacs-hwtac] key authentication expert
[Switch-hwtacacs-hwtac] key authorization expert
[Switch-hwtacacs-hwtac] user-name-format without-domain
[Switch-hwtacacs-hwtac] quit
# Apply the scheme to the ISP domain.
[Switch] domain bbb
[Switch-isp-bbb] scheme hwtacacs-scheme hwtac
[Switch-isp-bbb] quit
# Configure an SSH user, specifying the switch to perform password authentication for the user.
[Switch] ssh user client001 authentication-type password
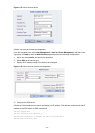
z Configure the SSH client
# Configure an IP address (192.168.1.1 in this case) for the SSH client. This IP address and that of the
VLAN interface on the switch must be in the same network segment.
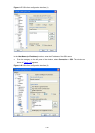
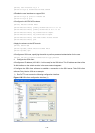
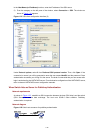
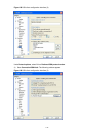
# Configure the SSH client software to establish a connection to the SSH server. Take SSH client
software Putty Version 0.58 as an example:
1) Run PuTTY.exe to enter the following configuration interface.
Figure 1-20 SSH client configuration interface (1)