


9-22
Chapter 9
Cajun P550/P880/P882 Switch User Guide
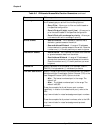
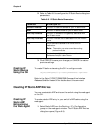
10. Select TCP Established. A check mark displays in the check
box.
11. Click CREATE to save your changes, or CANCEL to restore
previous settings. Once you create both access rules, all traffic
between subnet 10.1.1.0 and 10.1.2.0 is filtered.
* Notes: The traffic between subnet 10.1.1.0 and
10.1.3.0, and 10.1.2.0 and 10.1.3.0 is not filtered
because the access rules only filter traffic
between 10.1.1.0 and 10.1.2.0.
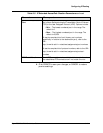
To filter traffic to a specific address and not to an
entire subnet, you must specify the destination
address of the network node, and use a subnet
wildcard of 0.0.0.0.
To filter all traffic, you must specify a destination
address of 0.0.0.0 and a subnet wildcard of
0.0.0.0. This is useful if you want to filter all
traffic except traffic that matches a previous
rule. Ensure that you do not make this your first
rule, since that overrides all subsequent rules.
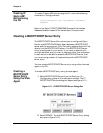
Activating Access Lists
You can activate access lists on the switch through the web agent
and the CLI.
Activating
Access Lists
Using the Web
Agent
To activate an access list using the web agent:
* Note: Before you can activate an access list, you must first
configure the access lists. For information about
configuring access lists, refer to “Configuring Access
Lists” earlier in this chapter.
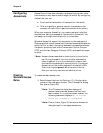
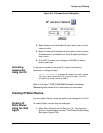
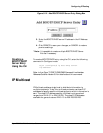
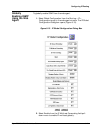
1. Select Access Control from the Routing > IP > Configuration
group on the web agent. The IP Access Control dialog box
opens (Figure 9-10).