


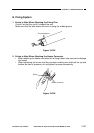
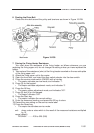

5. Adjusting the Nip
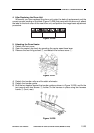
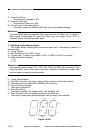
The nip should be as indicated in Figure 10-238. You must make the following
adjustments if fixing faults occur.
Figure 10-238
Note:
a and c represent points 10 cm from both edges of the copy.
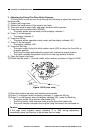
a. Measuring the Nip
Measure the nip before starting the day’s work; for example, first thing in the morning.
1) Open the copyboard cover, and make a solid black copy in A4.
2) Place the copy in the multifeeder with the solid black face up.
3) Press the service mode switch (SW302) using a hex key.
• The copier enters service mode, and indicates ‘1’.
4) Press [4] on the keypad.
• The copier indicates ‘4’.
5) Press the AE key.
• The copier enters operation/inspection mode, and indicates ‘401’.
6) Press [6] on the keypad.
• The copier indicates ‘406’.
7) Press the Start key.
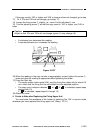
• The multifeeder picks up paper, and the copier positions the paper as in Figure
10-238 for measurement, and dischages it.
Reference:
The fixing rollers hold the paper and stop it when half of it has been delivered; the
paper is discharged automatically about 10 sec later.
8) Measure the nip.
10-30
CHAPTER 10 TROUBLESHOOTING
COPYRIGHT
©
1997 CANON INC. CANON NP6218 REV. 0 MAY 1997 PRINTED IN JAPAN (IMPRIME AU JAPON)
c
a
A4
paper
Feeding
direction
b
b : 4
-1mm
+2mm
a-c : 1mm or less
Center of copy
paper