


Chapter 3 Disassembly and Maintenance
3-5. Disassembly, Reassembly and Lubrication
CL-S700/CL-S703/CL-S700R 3-30
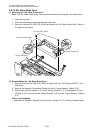
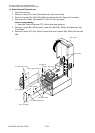
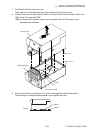
3-5-16. Disassembling the “Unit, Frame U”
To remove the “Unit, Frame U”, refer to Step 8 in "3-5-9. Each Unit on the “Unit, Mechanism".
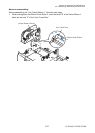
1. Remove the “SA, Gear Plate” [3-4].
1) Unhook the Gear Plate Spring [3-3] from the “SA, Gear Plate” [3-4].
2) Disengage 3 E-rings (E-Ring, 3) [3-23] and, from the “SA, Gear Plate” [3-4], remove 2 Idle
Gear A Sub Assemblies [3-1], 1 Idle Gear B Sub Assembly [3-2], 3 Polysliders [3-29] and 2
Polysliders 1 [3-22].
Note on reassembling:
• Apply grease (Floil G-311S) to the following points (refer to the places marked with in
Drawing No. 3 “Unit, Frame U” for the Printer Part in Chapter 5 “Parts List”):
• Idle Gear A Sub Assembly [3-1]: Gear surface
• Idle Gear B Sub Assembly [3-2]: Gear surface
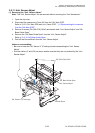
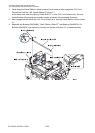
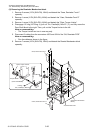
2. Bow the Offset Spring [3-13] (which ends are inserted into the frame) and remove it from the
frame.
Note on reassembling:
• Correctly set the Offset Spring [3-13] since the shape of its ends differs.
3. Slide the Head Plate [3-12] backward to remove it. Then the “Spring, Head R” [3-15] and
“Spring, Head L” [3-8] will come off.
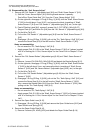
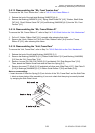
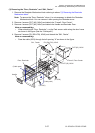
4. Remove the following parts from the Head Plate [3-12].
1) Cut the Wire Tie [3-7], remove 1 screw (BH (N), M4x4) [3-26] and 1 washer (EXT, T (N), 4)
[3-27], and detach the “SA, Head Cable” [3-6] and the “SA, Head Earth Cable” [3-32].
2) Remove the Head Earth Plate [3-11] and 1 screw (PH (TP) M3x8) [3-28] and peel off the
“Sheet, Cover Cable” [3-10] from the Head Plate [3-12].
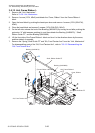
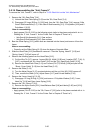
5. Remove the Slider [3-14].
1) Turn the Adjust Screw [3-17] counterclockwise until the nut (Nut, M3) [3-25] comes off.
2) Then, remove the Slider [3-14], Adjust Screw [3-17] and Curved Washer [3-16].
6. Remove the “Lever, Head Up” [3-19].
1) Disengage 1 E-ring (E-Ring, 2) [3-24] and remove 1 Polyslider Washer [3-20], “Lever,
Head Up” [3-19] and Open Lever Spring [3-18].
7. Remove the “SA, Frame U” [3-5].
1) Remove the Nylon Screw [3-21], Head Balance Seal [3-9] and labels ([3-30] and [3-31]).
Note on reassembling:
• Apply grease (Floil G-311S) to the “SA, Frame U” [3-5] (refer to the places marked with in
Drawing No. 3 “Unit, Frame U” for the Printer Part in Chapter 5 “Parts List”).