


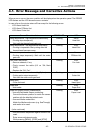
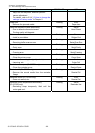


Chapter 4 Troubleshooting
4-2. Troubleshooting
4-11 CL-S700/CL-S703/CL-S700R
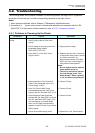
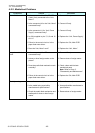
[Sensor Adjustment for user (Transparent Sensor/Reflective Sensor)]
The following describes the transparent and reflective sensor adjustment method (for user) for both
adjustable sensor and the front fixed sensor.
This method is stated in “Sensor Adjustments and Calibration” of the User’s Manual.
Preparation:
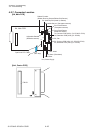
Transparent sensor:
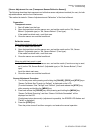
1. Peel off labels from the liner.
2. Open the head block and the sensor arm, and set the media on the “SA, Sensor
Bottom” (Adjustable type) or “SA, Sensor Bottom” (Fixed type).
If the media has black mark, avoid that area.
3. Close the sensor arm and the head block.
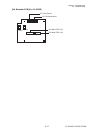
Reflective sensor:
When label with black mark is used
1. Peel off labels from the liner.
2. Open the head block and the sensor arm, and set the media on the “SA, Sensor
Bottom” (Adjustable type) or “SA, Sensor Bottom” (Fixed type).
If the media has black mark, avoid that area.
3. Close the sensor arm and the head block.
When tag with black mark is used
1. Open the head block and the sensor arm, and set the media (if continuous tag is used,
set it) on the “SA, Sensor Bottom” (Adjustable type) or “SA, Sensor Bottom” (Fixed
type).
Avoid the black mark area.
2. Close the sensor arm and the head block.
Sensor Adjustment Procedure:
1. Turn on the power while pressing and holding the [PAUSE], [FEED] and [STOP] keys.
“Sensor Cal Mode See Through (or Reflect)” is displayed on the LCD.
(To switch between “See Through” and “Reflect”, press and release the [STOP] key
while pressing and holding the [MENU] key.
2. Press and release the [PAUSE] key while pressing and holding the [MENU] key.
“Sensor Cal Mode Executing” and then “Sensor Cal Mode Succeeded” will be
displayed on the LCD.
(If adjustment stops abnormally (adjustment impossible), the ERROR LED flashes and
"Failed" is displayed.)
3. Press the [STOP] key.
Then the printer turns off and then on again, and enters the normal operation.