


Chapter 3 Disassembly and Maintenance
3-5. Disassembly, Reassembly and Lubrication
CL-S700/CL-S703/CL-S700R 3-32
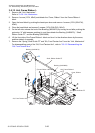
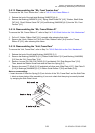
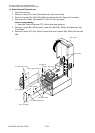
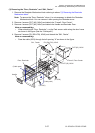
9. Remove the Tension Pulley [9-26].
1) Disengage the Tension Spring [9-29] from the Tension Plate block.
2) Disengage 1 E-ring (E-Ring, 3) [9-36] and pull out the Tension Plate block to the right.
3) Disengage 1 E-ring (E-Ring, 2) [9-37], pull out the Tensioner Pin [9-27], and remove the
Tension Pulley [9-26] from the “Plate, Tension” [9-28].
Notes on reassembling:
• Correctly hook the Tension Spring [9-29]. (Refer to Drawing No. 9 “Unit, Frame” in Chapter 5
“Parts List”).
• Apply grease (Floil G-311S) to the Tensioner Pin [9-27] (refer to the places marked with in
Drawing No. 9 “Unit, Frame” for the Printer Part in Chapter 5 “Parts List”).
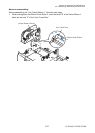
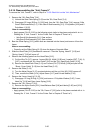
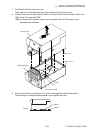
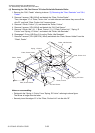
10. Remove the “SA, Connect PCB” [9-20] (CL-S700/CL-S703).
1) Disconnect the “SA, Option Cable 1” [9-21] (J15) and “SA, Option Cable 2” [9-22] (J16)
from the “SA, Connect PCB” [9-20].
2) Remove 2 screws (PH (SW+PW), M3x6) [9-33] and detach the “SA, Connect PCB” [9-20].
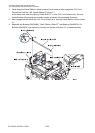
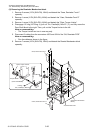
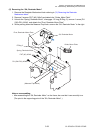
11. Remove the “SA, Frame Center” [9-19].
1) Remove 4 screws (PH (SW+PW), M3x6) [9-33] and detach the “SA, Frame Center” [9-19]
from the “SA, Frame” [9-10].